Thursday, 28 July 2022

Difference between Private, Public and Permissioned Blockchains


Difference between Private, Public and Permissioned Blockchains - iFour Technolab

The Blockchain has considerably showcased its extensiveness in laying solutions to essential market issues like security, transparency, accountability, time consumption, value, and more.

Every Custom Blockchain development Company has witnessed the big play of blockchain in improving the efficiency and effectiveness of the industry function.

Blockchain is maintained on a decentralized and distributed network of computers. There are few flavors of blockchain that have emerged in recent years.

Types of Blockchain networks

Blockchain has three types of network:

  • Public network
  • Private network
  • Permissioned network

All having their own advantages, depending upon the situation Blockchain platform is required for use. To utilize the best suited one, understanding each one of them is important.


Public network

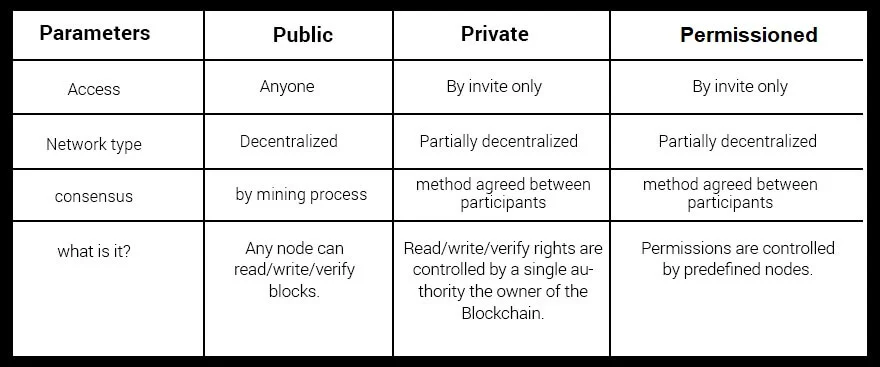
As the name suggests, public network is open to all. It can be joined by anyone with all the access rights to read, write and validate the blocks. Each entity participating in the network is known as a node.

In public network, identity of nodes is not known and there can be several advantages of it.

Advantages:

  • Equality! All the users will be treated equally as nobody is aware about who is another one in the network. Job of all the nodes present in the network is to read, write and validate blocks (in case they are interested) without knowing about the other node’s identity.
  • Removal of a central authority, which is one of the biggest motive of Blockchain.
  • All the transactions are open and transparent.
  • Every node in the network can monitor the transactions and if a transaction fails to receive consensus then it is not added to the block thus making the chain more secure.

Disadvantages:

  • Each block will be of limited size.
  • Transaction cost is high as miners will take the mining fee.
  • Process of adding block to the chain will take days or even weeks if mining fee provided is less.
  • There will be several miners mining the same block if Proof of Work (PoW) is followed, wasting multiple resources and energy.
  • Transactions added are public so if someone knows your public key then all the transactions made by you will be known.
  • As size of Blockchain increases, scalability decreases.
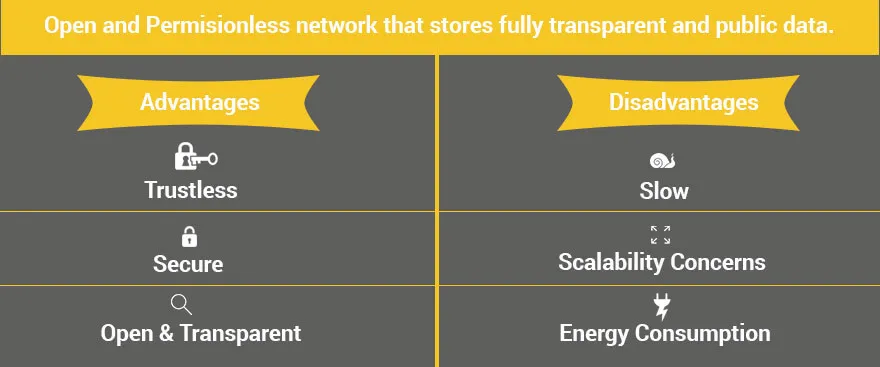
Open & Permissionless Network

Examples: Bitcoin is the best known example of public network. Other cryptocurrencies following public network are Ethereum, Litecoin, etc.

This kind of architecture is not good for enterprises as they want only limited people present in their organization to access the data they share and that too by their roles. Private network can be followed to achieve this aspect.

Private network

A central authority decides who can read/write/verify transactions. This kind of architecture is followed by an organization to keep data limited to the authority. Public read access may be allowed.

Advantages:

  • Users will have an identity known to each other so every node in the network will be able to see the details of the transaction initiator preventing the frauds.
  • User can join only through authentic and verified invitation.
  • Transactions can only be approved by the nodes having the authority.
  • Not decentralized, but is distributed and is secured based on cryptography concepts.
  • No transaction cost.
  • Quick action on approval/ disapproval of transactions.
  • Data will only be shared with trusted nodes improving privacy and security of the data.

Planning to Hire Blockchain Software Development Company? Your Search ends here.

Disadvantages:

  • Not decentralized and thus avoids one of the most important features of Blockchain

Examples: Hyperledger, Hashgraph, R3 Corda, etc.

Real-life example:

A person dealing with various suppliers must want to hide the contracts signed with another supplier. The financial details from the customers must also be kept hidden thus different rights to different users can be provided in private network.

Permissioned network

There is a thin line gap in private and permissioned network. Private network has a single organization as a central authority while permissioned network has multiple organizations as a central authority.

Multiple organizations involving in this process must have trust on each other to read/write and validate transactions.

Difference between public, private, and permissioned Blockchain
Access Modifiers


Thursday, 14 July 2022

Xamarin Forms - ReactiveUi ToDo List


Xamarin Forms - ReactiveUi ToDo List | iFour Technolab


Content Source: https://www.ifourtechnolab.com/blog/xamarin-forms-reactiveui-todo-list

What is ReactiveUi?

It is an advanced, Functional reactive MVVM and composable framework for all .Net frameworks.

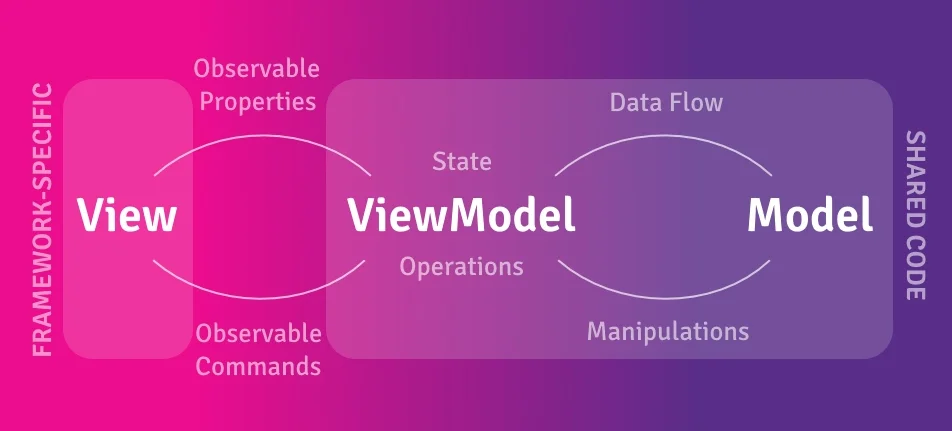
ReactiveUi supports reactive programming to ease the implementation of the MVVM patterns in the application.

MVVM frame- Compared to other works, ReactiveUi is not very dictatorial.

Reactive UI

Here, the Reactive Extensions (Rx) library is an appropriate use which, we declare callbacks and can manage asynchronous executions in the code and using the LinQ syntax, it does all these tasks.

It removes the unstructured & difficultly manageable code and makes it readable.

Generating ToDo List using ReactiveUi

For starting the project, we need to install 3 packages in the PCL project using NuGet package.

  • ReactiveUi.XamForms package

  • DynamicData package

  • Sextant.XamForms package

And we’ll have to use the 8.0 or above version of C#.

Now, we have to create four folders as Managers, Models, ViewModels, and Views and add the appropriate file as mentioned below.

HomePage -> HomeViewModel handles the Todo List as it’s the home page.

ItemPage -> ItemVewModel adds and edits the single items.

The Item model represents the Todo item.

ItemManagers handles the collection of Todo.

Code for All added files:

IItemManager.cs

public class ItemManager : IItemManager
{
public ItemManager()
{
ItemChanges = _itemsCache.Connect().RefCount();
}
public Optional<item> Get(string id) => _itemsCache.Lookup(id);
public IObservable<ichangeset<item, string="">> ItemChanges { get; }
public void AddOrUpdate(Item item) => _itemsCache.AddOrUpdate(item);
public void Remove(Item item) => _itemsCache.Remove(item);
private SourceCache<item, string=""> _itemsCache = new SourceCache<item, string="">(item => item.Id);
}
</item,></item,></ichangeset<item,></item>

Item.cs

public class Item : ReactiveObject
{
public Item(string id, string title)
{
Id = id;
Title = title;
}
public string Id { get; }
public string Title { get; }
public bool IsCompleted
{
get => _isCompleted;
set => this.RaiseAndSetIfChanged(ref _isCompleted, value);
}
private bool _isCompleted;
}

HomeViewModel.cs

public class HomeViewModel : ViewModelBase
{
public HomeViewModel(IParameterViewStackService navigationService, IItemManager
itemManager) : base(navigationService)
{
DeleteCommand = ReactiveCommand.Create<item>(itemManager.Remove);
itemManager
.ItemChanges
.Bind(out _items)
.DisposeMany()
.Subscribe()
.DisposeWith(Subscriptions);
AddCommand = ReactiveCommand.CreateFromObservable(() =>
NavigationService.PushModal<itemviewmodel>());
ViewCommand = ReactiveCommand.CreateFromObservable<item, unit="">((item) =>
{
SelectedItem = null;
return NavigationService.PushModal<itemviewmodel>(new NavigationParameter()
{
{ NavigationParameterConstants.ItemId , item.Id }
});
});
this.WhenAnyValue(x => x.SelectedItem)
.Where(x => x != null)
.InvokeCommand(ViewCommand)
.DisposeWith(Subscriptions);
}
public ReactiveCommand<unit, unit=""> AddCommand { get; }
public ReactiveCommand<item, unit=""> ViewCommand { get; }
public ReactiveCommand<item, unit=""> DeleteCommand { get; }
public Item SelectedItem
{
get => _selectedItem;
set => this.RaiseAndSetIfChanged(ref _selectedItem, value);
}
public ReadOnlyObservableCollection<item> Items => _items;
public override string Id => "Reactive ToDo";
private readonly ReadOnlyObservableCollection<item> _items;
private Item _selectedItem;
}
</item></item></item,></item,></unit,></itemviewmodel></item,></itemviewmodel></item>

ItemViewModel.cs

public class ItemViewModel:ViewModelBase
{
public ItemViewModel(IParameterViewStackService navigationService, IItemManager
itemManager) : base(navigationService)
{
_itemManager = itemManager;
var canExecute = this.WhenAnyValue(x => x.Title, (title) =>
!string.IsNullOrEmpty(title));
SaveCommand = ReactiveCommand.Create(ExecuteSave, canExecute);
CloseCommand = ReactiveCommand.CreateFromObservable(() =>
NavigationService.PopModal());
SaveCommand
.InvokeCommand(CloseCommand)
.DisposeWith(Subscriptions);
this.WhenAnyValue(x => x.ItemId)
.Where(x => x != null)
.Select(x => _itemManager.Get(x))
.Where(x => x.HasValue)
.Select(x => x.Value)
.Subscribe(x =>
{
Title = x.Title;
})
.DisposeWith(Subscriptions);
}
public override IObservable<unit> WhenNavigatingTo(INavigationParameter parameter)
{
if (parameter.TryGetValue(NavigationParameterConstants.ItemId, out string itemId))
{
ItemId = itemId;
}
return base.WhenNavigatedTo(parameter);
}
private void ExecuteSave() => _itemManager.AddOrUpdate(new Item(ItemId ??
Guid.NewGuid().ToString(), Title));
public ReactiveCommand<unit, unit=""> SaveCommand { get; }
public ReactiveCommand<unit, unit=""> CloseCommand { get; }
public override string Id => string.Empty;
public string Title
{
get => _title;
set => this.RaiseAndSetIfChanged(ref _title, value);
}
private string ItemId
{
get => _itemId;
set => this.RaiseAndSetIfChanged(ref _itemId, value);
}
private string _title;
private string _description;
private readonly IItemManager _itemManager;
private string _itemId;
}
</unit,></unit,></unit>

ViewModelBase.cs

public abstract class ViewModelBase:ReactiveObject,IDisposable,INavigable
{
protected ViewModelBase(IParameterViewStackService viewStackService) =>
NavigationService = viewStackService;
public abstract string id { get; }
public virtual IObservable<unit> WhenNavigatedFrom(INavigationParameter parameter) =>
Observable.Return(Unit.Default);
public virtual IObservable<unit> WhenNavigatedTo(INavigationParameter parameter) =>
Observable.Return(Unit.Default);
public virtual IObservable<unit> WhenNavigatingTo(INavigationParameter parameter) =>
Observable.Return(Unit.Default);
protected IParameterViewStackService NavigationService { get; }
public void Dispose()
{
Dispose(true);
GC.SuppressFinalize(this);
}
protected virtual void Dispose(bool disposing)
{
if (disposing)
{
Subscriptions?.Dispose();
}
}
protected readonly CompositeDisposable Subscription = new CompositeDisposable();
}
</unit></unit></unit>

HomePage.xaml

<xmp>
<?xml encoding="utf-8" version="1.0">
<rxui:reactivecontentpage title="ToDo List" x:class="TodoList.Views.HomePage" x:name="homePage" x:typearguments="vm:HomeViewModel" xmlns="http://xamarin.com/schemas/2014/forms" xmlns:rxui="clr-namespace:ReactiveUI.XamForms;assembly=ReactiveUI.XamForms" xmlns:vm="clr-namespace:TodoList.ViewModels" xmlns:x="http://schemas.microsoft.com/winfx/2009/xaml">
<stacklayout padding="20">
<collectionview itemssource="{Binding Items}" selecteditem="{Binding SelectedItem, Mode=TwoWay}" selectionmode="Single">
<collectionview.itemslayout>
<griditemslayout orientation="Vertical" verticalitemspacing="10" />
</collectionview.itemslayout>
<collectionview.itemtemplate>
<datatemplate>
<frame style="{StaticResource CardFrameStyle}">
<frame.triggers>
<datatrigger binding="{Binding IsCompleted}" targettype="Frame" value="True">
<setter property="Opacity" value="0.2" />
</datatrigger>
</frame.triggers>
<stacklayout orientation="Horizontal">
<checkbox ischecked="{Binding IsCompleted}" />
<label text="" verticaloptions="EndAndExpand">
<label.gesturerecognizers>
<tapgesturerecognizer command="{Binding
Source={x:Reference homePage},
Path=BindingContext.DeleteCommand}" commandparameter="{Binding}" />
</label.gesturerecognizers>
</label>
</stacklayout><label fontattributes="Bold" horizontaloptions="FillAndExpand" text="{Binding Title}" verticaloptions="Center">
</label></frame><label fontattributes="Bold" horizontaloptions="FillAndExpand" text="{Binding Title}" verticaloptions="Center">
</label></datatemplate><label fontattributes="Bold" horizontaloptions="FillAndExpand" text="{Binding Title}" verticaloptions="Center">
</label></collectionview.itemtemplate><label fontattributes="Bold" horizontaloptions="FillAndExpand" text="{Binding Title}" verticaloptions="Center">
</label></collectionview><label fontattributes="Bold" horizontaloptions="FillAndExpand" text="{Binding Title}" verticaloptions="Center"><button command="{Binding AddCommand}" style="{StaticResource CircularButtonStyle}" text="+"></button></label></stacklayout><label fontattributes="Bold" horizontaloptions="FillAndExpand" text="{Binding Title}" verticaloptions="Center">
</label></rxui:reactivecontentpage><label fontattributes="Bold" horizontaloptions="FillAndExpand" text="{Binding Title}" verticaloptions="Center">
</label></?xml></xmp><label fontattributes="Bold" horizontaloptions="FillAndExpand" text="{Binding Title}" verticaloptions="Center">
</label>

ItemPage.xaml

<label fontattributes="Bold" horizontaloptions="FillAndExpand" text="{Binding Title}" verticaloptions="Center">
<xmp><?xml encoding="utf-8" version="1.0">
<?xml encoding="utf-8" version="1.0">
<rxui:reactivecontentpage x:class="TodoList.Views.ItemPage" x:typearguments="vm:ItemViewModel" xmlns="http://xamarin.com/schemas/2014/forms" xmlns:rxui="clr-namespace:ReactiveUI.XamForms;assembly=ReactiveUI.XamForms" xmlns:vm="clr-namespace:TodoList.ViewModels" xmlns:x="http://schemas.microsoft.com/winfx/2009/xaml">
<rxui:reactivecontentpage.toolbaritems>
<toolbaritem command="{Binding CloseCommand}" text="Close" />
</rxui:reactivecontentpage.toolbaritems>
<stacklayout>
<label fontsize="Title" horizontaloptions="Center" padding="20" text="Item">
<frame margin="10" style="{StaticResource CardFrameStyle}" verticaloptions="Start">
<stacklayout horizontaloptions="FillAndExpand">
<entry placeholder="Title" text="{Binding Title}" /><button command="{Binding SaveCommand}" style="{StaticResource MainButtonStyle}" text="Save"></button></stacklayout>
</frame>
</label></stacklayout><label fontsize="Title" horizontaloptions="Center" padding="20" text="Item">
</label></rxui:reactivecontentpage><label fontsize="Title" horizontaloptions="Center" padding="20" text="Item">
</label></?xml></?xml></xmp><label fontsize="Title" horizontaloptions="Center" padding="20" text="Item">
</label></label>

Planning to Hire Xamarin App Development Company ? Your Search ends here.

App.xaml:

<label fontattributes="Bold" horizontaloptions="FillAndExpand" text="{Binding Title}" verticaloptions="Center"><label fontsize="Title" horizontaloptions="Center" padding="20" text="Item">
<xml><!--?xml version="1.0" encoding="utf-8"--><!--?xml version="1.0" encoding="utf-8"-->
<!--?xml version="1.0" encoding="utf-8" ?-->
<application x:class="TodoList.App" xmlns="http://xamarin.com/schemas/2014/forms" xmlns:x="http://schemas.microsoft.com/winfx/2009/xaml">
<application.resources>
<resourcedictionary><style targettype="Frame" type="text/css" x:key="CardFrameStyle"><Setter Property="HasShadow" Value="False" />
<Setter Property="BorderColor" Value="Black" />
<Setter Property="Padding" Value="10" /></style><style targettype="Button" type="text/css" x:key="MainButtonStyle"><Setter Property="TextColor" Value="White" />
<Setter Property="BackgroundColor" Value="Black" />
<Setter Property="HorizontalOptions" Value="FillAndExpand" /></style><style targettype="Button" type="text/css" x:key="CircularButtonStyle"><Setter Property="TextColor" Value="White" />
<Setter Property="BackgroundColor" Value="Black" />
<Setter Property="HorizontalOptions" Value="Center" />
<Setter Property="CornerRadius" Value="40" />
<Setter Property="WidthRequest" Value="80" />
<Setter Property="HeightRequest" Value="80" />
<Setter Property="FontSize" Value="50" /></style>
</resourcedictionary>
</application.resources>
</application>
<!--?xml--><!--?xml--></xml>
</label></label>
 

App.xaml.cs

 
<label fontattributes="Bold" horizontaloptions="FillAndExpand" text="{Binding Title}" verticaloptions="Center"><label fontsize="Title" horizontaloptions="Center" padding="20" text="Item">
public partial class App : Application
{
public App()
{
InitializeComponent();
RxApp.DefaultExceptionHandler = new RxExceptionHandler();
Instance.InitializeForms();
Locator
.CurrentMutable
.RegisterConstant<iitemmanager><!--?xml version="1.0" encoding="utf-8"--><!--?xml version="1.0" encoding="utf-8"-->(new ItemManager());
Locator
.CurrentMutable
.RegisterNavigationView(() => new NavigationView(RxApp.MainThreadScheduler,
RxApp.TaskpoolScheduler, ViewLocator.Current))
.RegisterParameterViewStackService()
.RegisterView<homepage, homeviewmodel="">()
.RegisterView<itempage, itemviewmodel="">()
.RegisterViewModel(() => new
HomeViewModel(Locator.Current.GetService<iparameterviewstackservice>(),
Locator.Current.GetService<iitemmanager>()))
.RegisterViewModel(() => new
ItemViewModel(Locator.Current.GetService<iparameterviewstackservice>(),
Locator.Current.GetService<iitemmanager>()));
Locator
.Current
.GetService<iparameterviewstackservice>()
.PushPage<homeviewmodel>(null, true, false)
.Subscribe();
MainPage = Locator.Current.GetNavigationView("NavigationView");
}
}
</homeviewmodel></iparameterviewstackservice></iitemmanager></iparameterviewstackservice></iitemmanager></iparameterviewstackservice></itempage,></homepage,><!--?xml--><!--?xml--></iitemmanager></label></label>

NavigationParameterConstants.cs
<label fontattributes="Bold" horizontaloptions="FillAndExpand" text="{Binding Title}" verticaloptions="Center"><label fontsize="Title" horizontaloptions="Center" padding="20" text="Item">
public class NavigationParameterConstants
{
public const string ItemId = "ItemId";
}
</label></label>
RxExceptionHandler.cs
<label fontattributes="Bold" horizontaloptions="FillAndExpand" text="{Binding Title}" verticaloptions="Center"><label fontsize="Title" horizontaloptions="Center" padding="20" text="Item">
public class RxExceptionHandler : IObserver<exception><!--?xml version="1.0" encoding="utf-8"--><!--?xml version="1.0" encoding="utf-8"-->
{
public void OnNext(Exception ex)
{
if (Debugger.IsAttached)
{
Debugger.Break();
}
RxApp.MainThreadScheduler.Schedule(() => { throw ex; });
}
public void OnError(Exception ex)
{
if (Debugger.IsAttached)
{
Debugger.Break();
}
RxApp.MainThreadScheduler.Schedule(() => { throw ex; });
}
public void OnCompleted()
{
if (Debugger.IsAttached)
{
Debugger.Break();
}
RxApp.MainThreadScheduler.Schedule(() => { throw new NotImplementedException(); });
}
}
</exception></label></label>
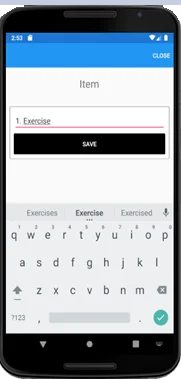
newmobile2


Add Item


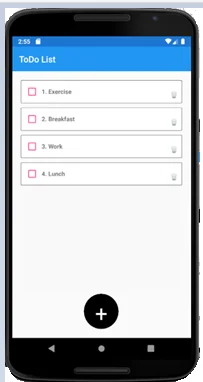
newmobile3


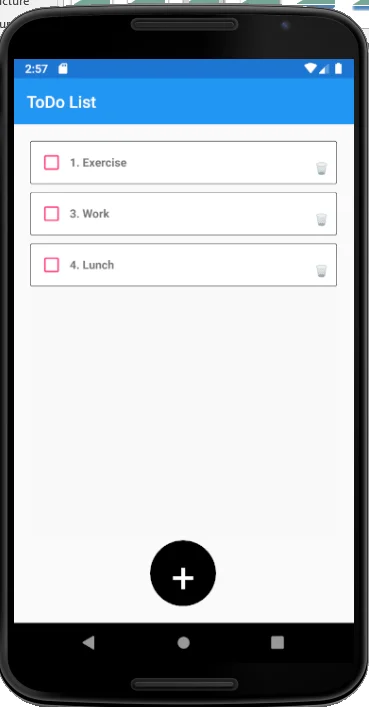
Items List


newmobile4


List after deleting item


Conclusion

Using ReactiveUi, we get the power to make reactive, testable, and composable Ui as we use the MVVM pattern. The Todo list is used to manage our day-to-day timetable to be followed. And using this, we can also make some applications that give responses quickly and in an understandable way.

PowerApps Consulting Services - Driving Innovation in Enterprise Solutions

Driving innovation while keeping costs in check is something that every executive looks for. Microsoft Power Apps is a leading low-code app ...