Monday, 10 October 2022

.NET highcharts with MVC Applications


.NET highcharts with MVC Applications

Content source: https://www.ifourtechnolab.com/blog/net-highcharts-with-mvc-applications


Introduction

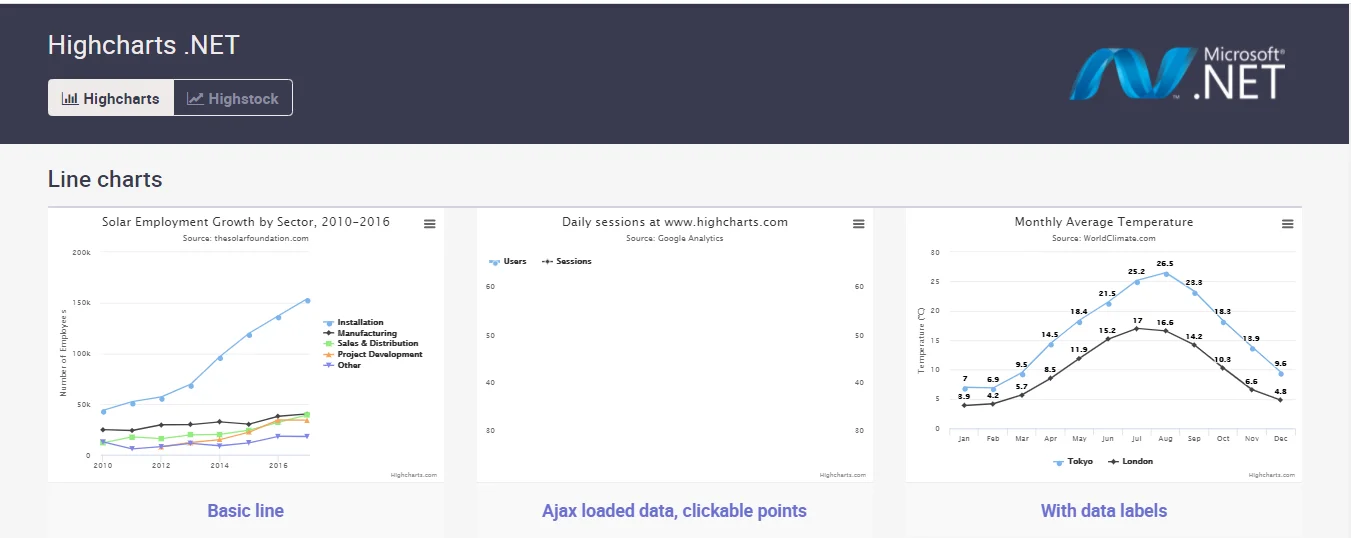
These days, users are more inclined towards visual representations such as graphs, charts, pie diagrams, etc. to understand the data quickly, which a plain table won’t demonstrate important relationships easily between two or more data points. So, the ASP.NET MVC application uses a JavaScript library called .NET highcharts to implement charting functionality like line charts, area charts, column charts, bar charts, pie charts, etc.

Using highcharts, we can create many different types of charts. So, in this blog, we will see how to create highcharts in the server-side of ASP.NET MVC. Here, server-side means everything that will be created that on the server-side and client-side will contain only displaying part.
STEP 1 - Create an ASP.NET Web Application.

Firstly, Open Visual Studio 2017 or any versions of Visual Studio and then click on “File” and add then select “New Project” windows and choose the ASP.NET Web Application(.NET Framework) and then give the appropriate name to the project like “DemoHighchartswithMVC”, choose the location where you want to save your project and then click on OK.

STEP 2 - Install DotNet.Highcharts Package.

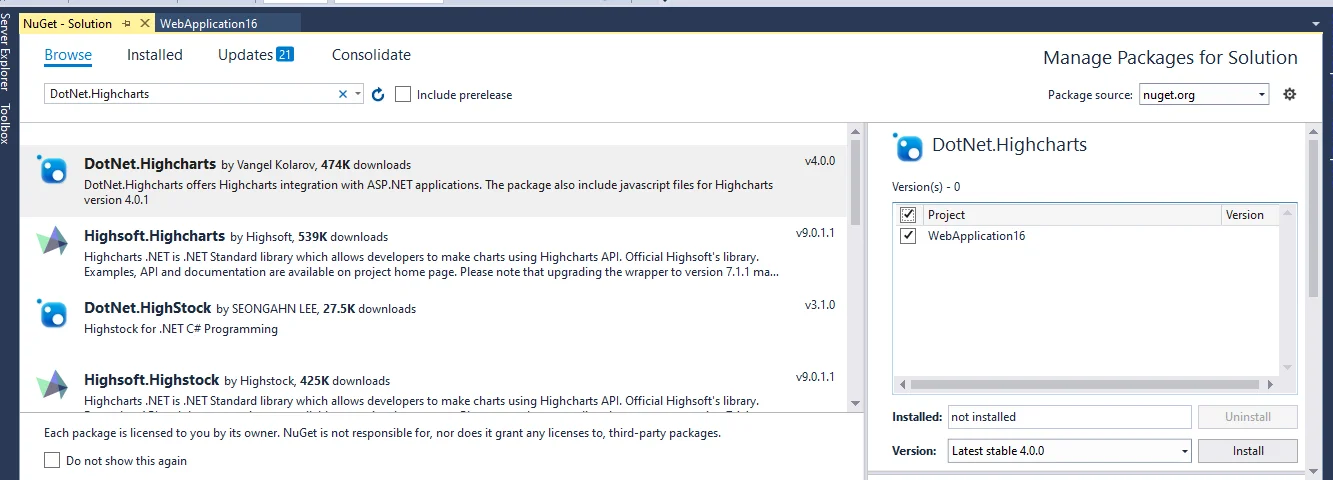
To install DotNet.Highcharts in your MVC application, you need to right-click on your project Solution Explorer and then right-click on your solution file and then click on "Manage NuGet Packages for solution". It will open the NuGet Package Manager after selecting the browse option you can search for the “DotNet.Highcharts” from the search textbox as given below and then select the checkbox of the project and click on the install to add the latest version of the package in your project.
img2
Figure: Install the DotNet.Highcharts package in project

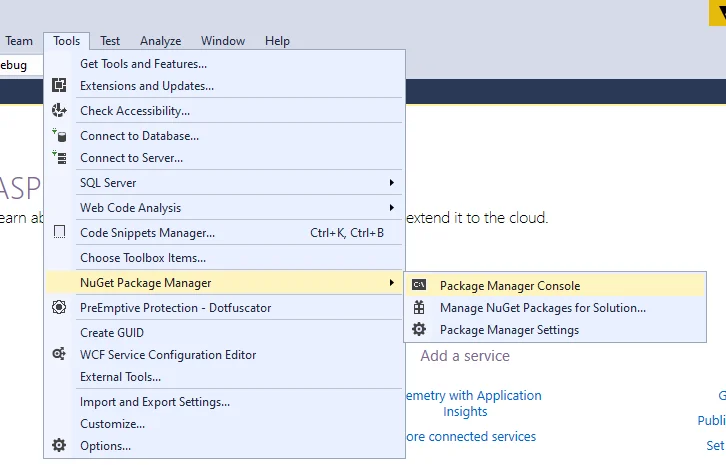
We can also install the “DotNet.HighCharts” package via the Package Manager console. For that, we have to go to "Tools -> menu” and select NuGet Package Manager and then choose “Package Manager Console” from it.
img3
Figure: Another way to Install the DotNet.Highcharts package in project

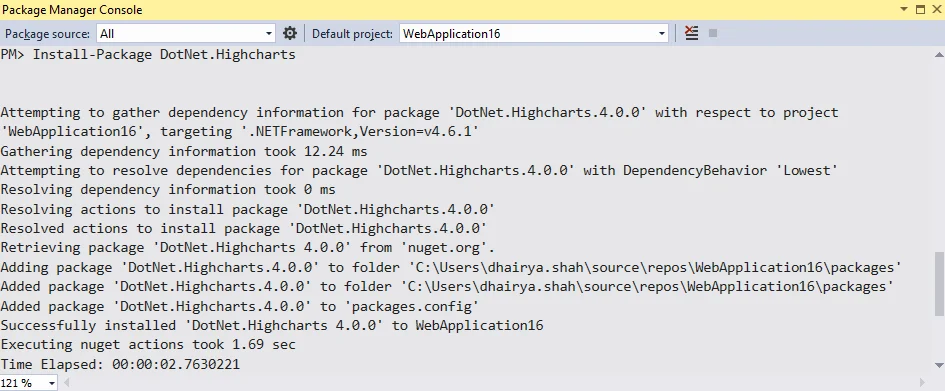
To install the package, we have to type the following command:

Install-Package DotNet.Highcharts
img4
Figure: Command to install the “DotNet.Highcharts”

Now, if you open the Solution Explorer, you will see that Highcharts script is added in Scripts folder and the reference of DotNet.Highcharts is added in the References section.
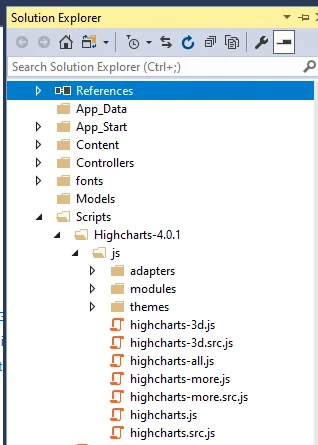
img5
Figure: Reference and highcharts script is added in the project

STEP 3 - Create Highcharts in the project

Now, if you open the Solution Explorer, you will see that Highcharts script file is added in the Scripts folder of the project solution file and the reference of DotNet.Highcharts is added in the References section.

To initialize with basic configuration, first I am going to create a chart that shows the type of a chart, background color, border, etc., and provide an appropriate name for it.

Now, we have to define the text for a chart to set the title and subtitle.

Example
barChart.SetTitle(new Title()
{
Text = "Dravid Vs Ganguly"
});
barChart.SetSubtitle(new Subtitle()
{
Text = "Runs of 10 years(2004-2013)"
});
 

Using the method SetXAxis and SetYAxis, we can define the axis of the chart like what should render on xAxis and yAxis. we can define the title, type, and category of the axis as well.


Example
barChart.SetYAxis(new YAxis()
{
Title = new YAxisTitle()
{
Text = "Runs",
Style = "fontSize: '20px',color: 'green',fontWeight: 'Bold'"
},
ShowFirstLabel = true,
ShowLastLabel = true,
Min = 0
});
barChart.SetXAxis(new XAxis()
{
Type = AxisTypes.Category,
Title = new XAxisTitle() { Text = "Years", Style = "fontSize: '20px',fontWeight: 'bold', " },
Categories = new[] { "2004", "2005", "2006", "2007", "2008", "2009", "2010", "2011", "2012", "2013" }
});
barChart.SetLegend(new Legend
{
Enabled = true,
BorderColor = System.Drawing.Color.DarkRed,
BorderRadius = 15,
BackgroundColor = new BackColorOrGradient(ColorTranslator.FromHtml("#FFADD8E6"))
});
 

Now, we can use SetSeries() method to set the data with series, where we have to provide a name for data and series which is used to bind with series.

Example
barChart.SetSeries(new Series[]
{
new Series{
Name = "Rahul Dravid",
Data = new Data(new object[] { 128, 429, 628, 425, 459, 772
, 914, 555, 666 ,201})
},
new Series()
{
Name = "Saurav Ganguly",
Data = new Data(new object[] { 921, 157, 281, 1111, 597, 181, 511, 164, 564,304 })
}
}
);
return View(barChart);
}

The code that appears below is a code of index action method for home controller:


Example
using DotNet.Highcharts;
using DotNet.Highcharts.Enums;
using DotNet.Highcharts.Helpers;
using DotNet.Highcharts.Options;
using System;
using System.Collections.Generic;
using System.Drawing;
using System.Linq;
using System.Web;
using System.Web.Mvc;
namespace Asp.NETMVCHighChartsDemo.Controllers
{
public class HomeController : Controller
{
public ActionResult Index()
{
Highcharts barChart = new Highcharts("barchart");
barChart.InitChart(new Chart()
{
Type = DotNet.Highcharts.Enums.ChartTypes.Bar,
BackgroundColor = new BackColorOrGradient(System.Drawing.Color.LightGreen),
Style = "fontWeight: 'bold', fontSize: '17px'",
BorderColor = System.Drawing.Color.DarkBlue,
BorderRadius = 0,
BorderWidth = 2
});
barChart.SetTitle(new Title()
{
Text = "Dravid Vs Ganguly"
});
barChart.SetSubtitle(new Subtitle()
{
Text = "Runs of 10 years(2004-2013)"
});
barChart.SetYAxis(new YAxis()
{
Title = new YAxisTitle()
{
Text = "Runs",
Style = "fontSize: '20px',color: 'green',fontWeight: 'Bold'"
},
ShowFirstLabel = true,
ShowLastLabel = true,
Min = 0
});
barChart.SetXAxis(new XAxis()
{
Type = AxisTypes.Category,
Title = new XAxisTitle() { Text = "Years", Style = "fontSize: '20px',fontWeight: 'bold', " },
Categories = new[] { "2004", "2005", "2006", "2007", "2008", "2009", "2010", "2011", "2012", "2013" }
});
barChart.SetLegend(new Legend
{
Enabled = true,
BorderColor = System.Drawing.Color.DarkRed,
BorderRadius = 15,
BackgroundColor = new BackColorOrGradient(ColorTranslator.FromHtml("#FFADD8E6"))
});
barChart.SetSeries(new Series[]
{
new Series{
Name = "Rahul Dravid",
Data = new Data(new object[] { 128, 429, 628, 425, 459, 772, 914, 555, 666 ,201})
},
new Series()
{
Name = "Saurav Ganguly",
Data = new Data(new object[] { 921, 157, 281, 1111, 597, 181, 511, 164, 564,304 })
}
}
);
return View(barChart);
}
}
}

STEP 4 - Rendering of highcharts on UI

Now, move to the view of Index action method of home controller and add the code which appears as below and after that render this bar chart on UI.

Looking for Trusted .Net Development Company ?
Your Search ends here.


Example
@model DotNet.Highcharts.Highcharts
@{
ViewBag.Title = "Home Page";
}

Example of DotNet Highcharts in Asp.Net MVC

Learn more »

@(Model)

A Highcharts.js file is required to render Highchart on the client-side. So, we have to add the Highchart.js in the script tag of _Layout.cshtml file as below.


Example
<xmp>
<!doctype html=""><html><head>
<meta charset="utf-8" />
<meta name="viewport" content="width=device-width, initial-scale=1.0"><title></title>
@Styles.Render(&quot;~/Content/css&quot;)
@Scripts.Render(&quot;~/bundles/modernizr&quot;)
@Scripts.Render(&quot;~/bundles/jquery&quot;)</head><body><p> </p>
<div class="navbar navbar-inverse navbar-fixed-top"><div class="container"><div class="navbar-header"><button class="navbar-toggle" data-target=".navbar-collapse" data-toggle="collapse" type="button"></button>
@Html.ActionLink(&quot;Application name&quot;, &quot;Index&quot;, &quot;Home&quot;, new { area = &quot;&quot; }, new { @class = &quot;navbar-brand&quot; })</div>
<div class="navbar-collapse collapse"><ul class="nav navbar-nav"><li> </li><li>@Html.ActionLink(&quot;Home&quot;, &quot;Index&quot;, &quot;Home&quot;)</li><li> </li><li>@Html.ActionLink(&quot;About&quot;, &quot;About&quot;, &quot;Home&quot;)</li><li> </li><li>@Html.ActionLink(&quot;Contact&quot;, &quot;Contact&quot;, &quot;Home&quot;)</li><li> </li></ul></div></div></div>
<p> </p>
<div class="container body-content">
@RenderBody()<hr /><footer><p>&copy; @DateTime.Now.Year - My ASP.NET Application</p></footer></div>
<p>
<script src="~/Scripts/Highcharts-4.0.1/js/highcharts.js"></script>
@Scripts.Render(&quot;~/bundles/bootstrap&quot;)
@RenderSection(&quot;scripts&quot;, required: false)</p></body></html>
</!doctype></xmp>

When everything is done, then run the MVC application. It will render a bar chart as following.
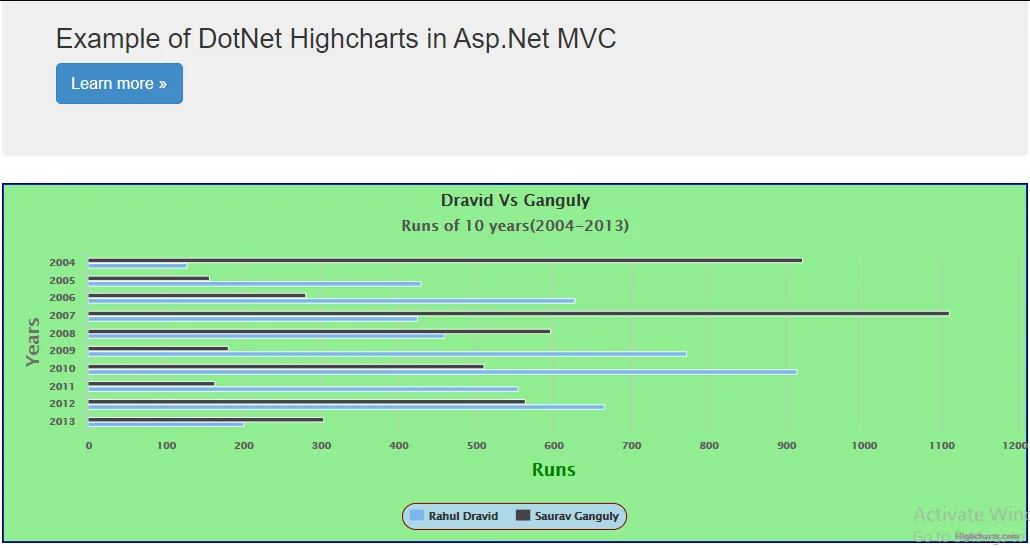
img6
Figure: Output of MVC Application

Conclusion

In this blog, we have seen the implementation of “DotNet Highcharts” at the server-side by using the ASP.NET MVC application, which is useful for making different types of charts like bar charts, column charts, line charts, pie charts, etc. It is useful when a developer desires to check data in visual representation form like graphs, charts at the client-side.

PowerApps Consulting Services - Driving Innovation in Enterprise Solutions

Driving innovation while keeping costs in check is something that every executive looks for. Microsoft Power Apps is a leading low-code app ...