Source of content: https://www.ifourtechnolab.com/blog/getting-started-with-web-apps-in-microsoft-azure
What is Microsoft Azure?
Microsoft Azure is also known as Windows Azure, it is Microsoft’s public cloud computing platform. Microsoft Azure provides a range of cloud services, including compute, analytics, storage, and networking. The user can pick and choose from these services to develop and scale new applications, or run existing applications in the public cloud.
This platform aims to help businesses and manage challenges to meet their organizational goals. Microsoft Azure offers four different forms of cloud computing such as Infrastructure as a Service (IaaS), platform as a service (PaaS), software as a service (SaaS), and serverless.
Prerequisites
You can create a free account with your email id in Microsoft Azure Portal. Install Visual Studio 2019.
If Visual Studio 2019 already installed on your computer then
Install the latest updates in Visual Studio by selecting Help > Check for Updates.
Select Tools > Get Tools and Features.
Create an ASP.NET Core Web App
These are the following steps to create an ASP.NET Core web in Visual Studio:
1. Create a new project in Visual Studio.
2. In a selected project, select the ASP.NET Core Web Application, then click Next.
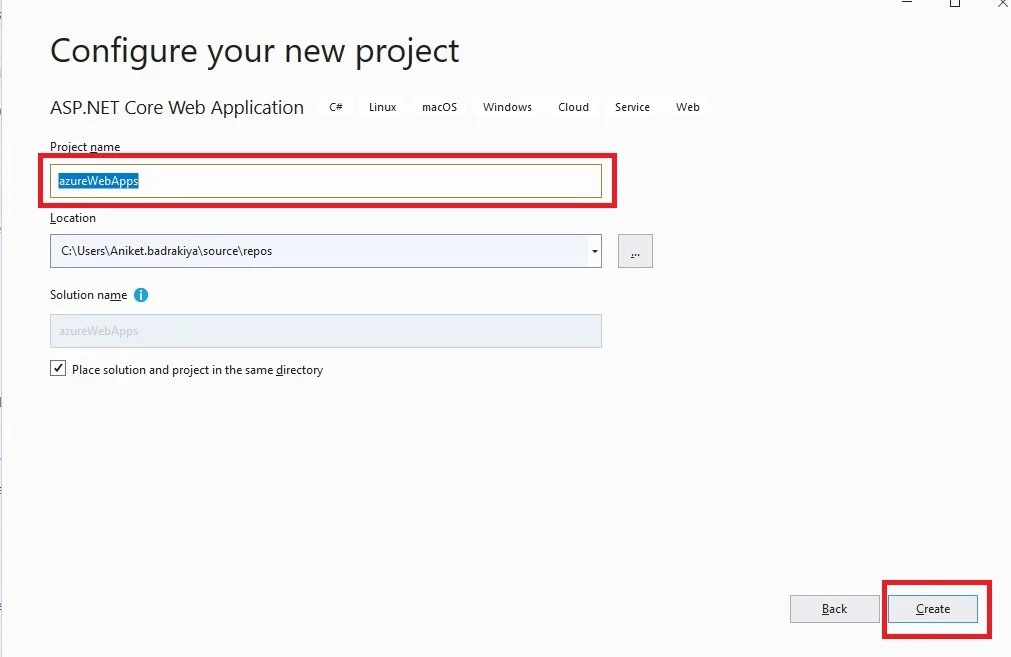
3. Configure your new project, project name azureWebApps, and select Create
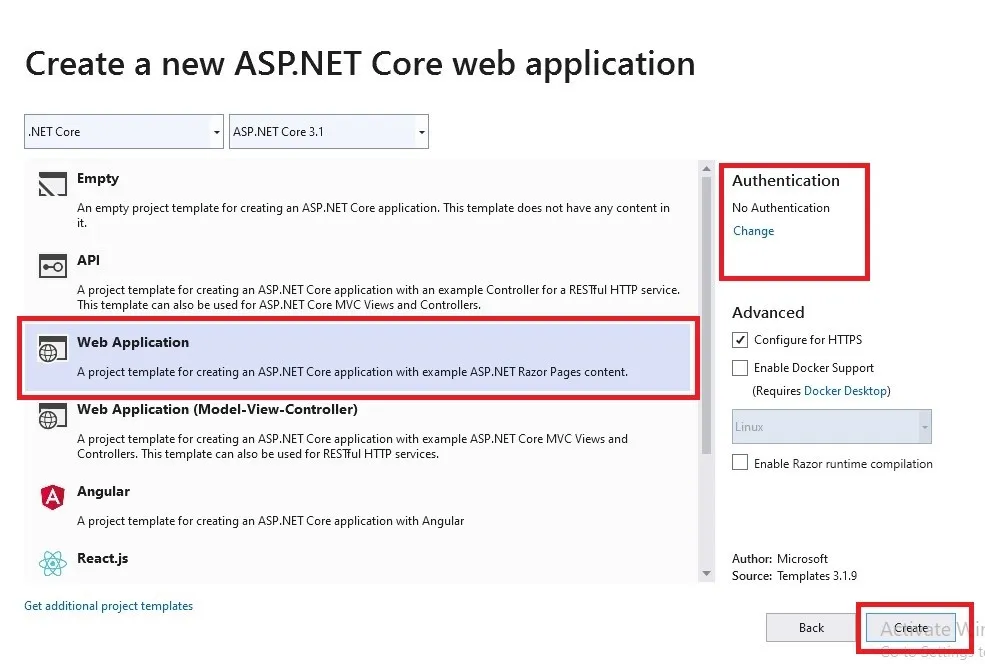
4. In the ASP.NET Core web app, you can deploy any types of web app to Azure, choose the Web Application template. By default, Authentication is set to No Authentication, and you have no other option then to select Create.
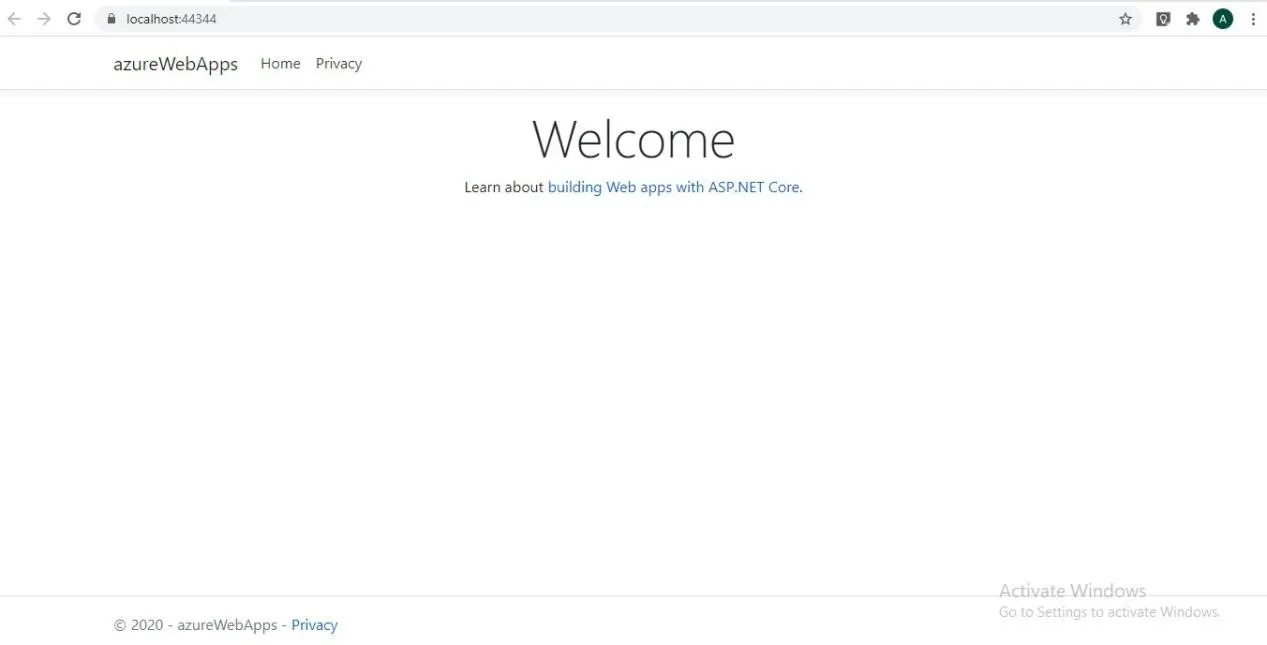
5. In Visual Studio, Select Debug > Start Without Debugging and run your web app locally.
Read More: What Is Routing In Asp.NET Core MVC?
Publish Your Web App
When you publish your web app, you should initially create and configure a new App Service that you can publish your web app too.
There are the following steps to create App Service:
In Microsoft Azure, A new resource group contains all of the Azure resources for the service.
In Microsoft Azure, A new Hosting Plan specifies the location, size, and features of the web server farm that hosts your app.
Follow the below steps to create your App Service and to publish your web app.
1. Open Solution Explorer, right-click the azureWebApps project, and select Publish. You have not already signed-in to your Azure account in Visual Studio, select either Add or Sign In. In Microsoft Azure, you have to create a free Azure account.
2. Choose App Service, select create new, and then select create profile in that section pick a publish target dialog box.
3.app. In this name, Valid characters are alphanumeric and “- “. This name is used as the URL prefix for your app in the format
4. Accept the subscription that is listed or select a new one from the drop-down list.
5. Select New in Resource group, after New resource group name, enter resourceGroupName and select OK.6. Select the New for Hosting Plan
6. Select the New for Hosting Plan.
7. Create a new dialog, enter the values specified in the following table in the Hosting Plan.
| Setting | Suggested Value | Description |
|---|---|---|
| Hosting Plan | azureWebAppsPlan | Name of the App Service Plan. |
| Location | The datacenter where an app is hosted. | |
| Size | Free | The Pricing tier determines hosting features. |
8. Set to none in Leave Application Insights.
9. Create a new dialog box, select create to start creating the Azure resources in the App Service.
10. Select Publish, once you are completed.
The Visual Studio publishes your ASP.NET Core web app to Azure, and your app is launched in your default browser.
Your ASP.NET Core web apps are running live in Azure App service.
Update the App and Redeploy
There are the following steps to update and redeploy your web app.
1. In your project, open Pages > Index.cshtml.
2. You can change code as per the requirements of your project.
Example:
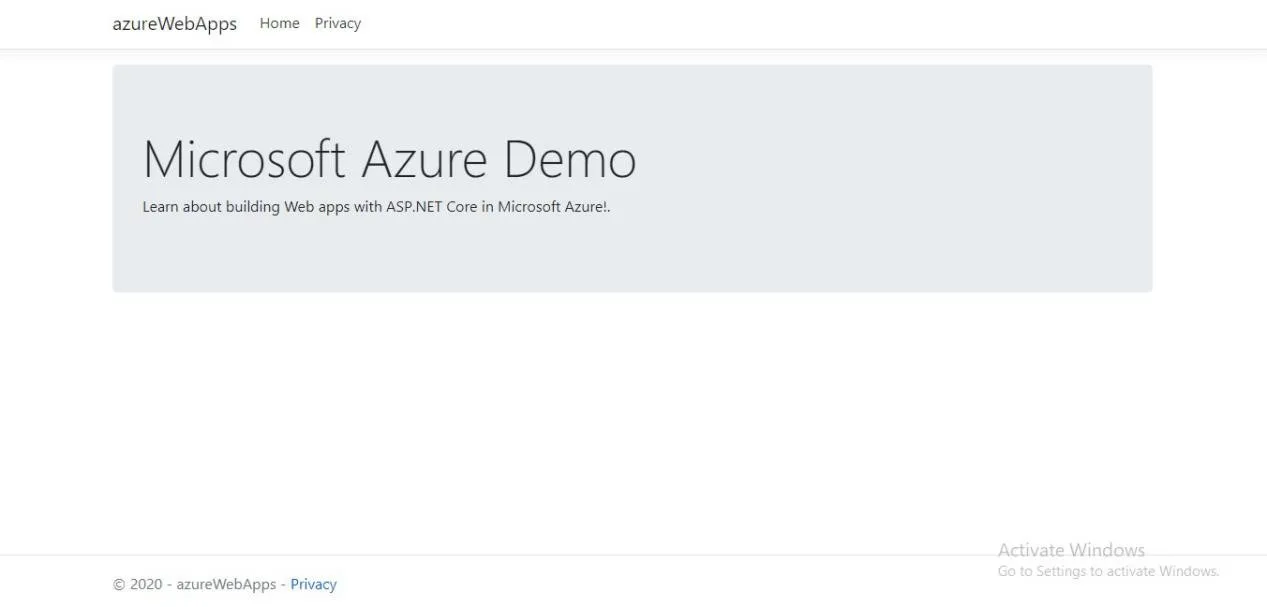
<div class="jumbotron"><h1 class="display-4">Microsoft Azure Demo</h1>
<p>Learn about building Web apps with ASP.NET Core in Microsoft Azure!.</p></div>
3. Right-click the azureWebApps project in Solution Explorer and select Publish, redeploy to Azure.
4. Select Publish, on the Publish summary page.
Visual Studio launches a browser to the URL of the web app after publishing completes.
Looking to Hire .NET Developer? Your Search ends here.
Manage the Azure App
If you manage your web app, go to the Azure portal, and search for and select App service. Select the name of your web app on the App Services page.
There are many options for basic management like browse, stop, start, restart, delete in the Overview page for your web app. The left side panel provides further pages for configuring your app.
Clean Up Resources
In the above steps, you have created Azure resources in a resource group. If your web app is not needed in the future, so you can delete them by deleting the resource group. Select Resource group from the Azure portal menu or Home page. Select your resource group name on the Resource groups page.
There are listed resources once you want to delete on your resource group name.
You can select the Delete resource group, type your resource group name in the next box to confirm, and select Delete.
Conclusion
If you are a student and you have created projects in any language like PHP, ASP.NET, Ruby, Python, Node.js, Java, etc, Azure is the best platform for your project to run it live.
In Azure, we’ve explored Azure’s compute and storage services, SQL Azure, Access Control, and Service Bus, and we’ve seen how our existing skills works in .NET and SQL Server that can easily be leveraged on Azure. We hope you acquired a useful information and a better understanding of how WebApps work in Azure.

.jpg)






.jpg)