Sunday, 23 April 2023

Explain Forms Authentication in ASP.NET MVC


Explain Forms Authentication in ASP.NET MVC

Introduction


Sign up, sign in, and Log out are three things that we always have in mind while developing a web application. The following points will be discussed in depth as part of this.

 
  1. How can I sign up or register a new user in our app?
  2. Built the User Login Page
  3. How to use the built-in Authorize Attribute
  4. Adding the logout functionality
  5. How to utilize Forms Authentication in an MVC application to accomplish all of the above goals?

The following three steps are required to implement Forms Authentication in an MVC application.

 
  1. In the web.config file, set the authentication mode to Forms.
  2. FormsAuthentication.SetAuthCookie is required to use for login.
  3. Again FormAuthentication.SignOut is required to use for logout.
Step 1

Open any version of your SQL Server database and it makes no difference which version you have.

Create Employee Table


CREATE TABLE [dbo].[Department](
[Id] [int] IDENTITY(1,1) NOT NULL,
[DepartmentName] [nvarchar](50) NULL,
PRIMARY KEY CLUSTERED
(
[Id] ASC
)WITH (PAD_INDEX = OFF, STATISTICS_NORECOMPUTE = OFF, IGNORE_DUP_KEY = OFF, ALLOW_ROW_LOCKS = ON, ALLOW_PAGE_LOCKS = ON) ON [PRIMARY]
) ON [PRIMARY]
GO

Create Department Table


CREATE TABLE [dbo].[Users](
[Id] [int] IDENTITY(1,1) NOT NULL,
[Username] [nvarchar](50) NULL,
[Password] [nvarchar](50) NULL,
PRIMARY KEY CLUSTERED
(
[Id] ASC
)WITH (PAD_INDEX = OFF, STATISTICS_NORECOMPUTE = OFF, IGNORE_DUP_KEY = OFF, ALLOW_ROW_LOCKS = ON, ALLOW_PAGE_LOCKS = ON) ON [PRIMARY]
) ON [PRIMARY]
GO

Create Users Table


CREATE TABLE [dbo].[Users](
[Id] [int] IDENTITY(1,1) NOT NULL,
[Username] [nvarchar](50) NULL,
[Password] [nvarchar](50) NULL,
PRIMARY KEY CLUSTERED
(
[Id] ASC
)WITH (PAD_INDEX = OFF, STATISTICS_NORECOMPUTE = OFF, IGNORE_DUP_KEY = OFF, ALLOW_ROW_LOCKS = ON, ALLOW_PAGE_LOCKS = ON) ON [PRIMARY]
) ON [PRIMARY]
GO

Create Users Table


CREATE TABLE [dbo].[UserRolesMapping](
[Id] [int] IDENTITY(1,1) NOT NULL,
[UserId] [int] NULL,
[RoleId] [int] NULL,
PRIMARY KEY CLUSTERED
(
[Id] ASC
)WITH (PAD_INDEX = OFF, STATISTICS_NORECOMPUTE = OFF, IGNORE_DUP_KEY = OFF, ALLOW_ROW_LOCKS = ON, ALLOW_PAGE_LOCKS = ON) ON [PRIMARY]
) ON [PRIMARY]
GO

Create UserRoles Table


CREATE TABLE [dbo].[UserRolesMapping](
[Id] [int] IDENTITY(1,1) NOT NULL,
[UserId] [int] NULL,
[RoleId] [int] NULL,
PRIMARY KEY CLUSTERED
(
[Id] ASC
)WITH (PAD_INDEX = OFF, STATISTICS_NORECOMPUTE = OFF, IGNORE_DUP_KEY = OFF, ALLOW_ROW_LOCKS = ON, ALLOW_PAGE_LOCKS = ON) ON [PRIMARY]
) ON [PRIMARY]
GO
ALTER TABLE [dbo].[UserRolesMapping] WITH CHECK ADD FOREIGN KEY([RoleId])
REFERENCES [dbo].[Roles] ([Id])
GO
ALTER TABLE [dbo].[UserRolesMapping] WITH CHECK ADD FOREIGN KEY([RoleId])
REFERENCES [dbo].[Roles] ([Id])
GO
ALTER TABLE [dbo].[UserRolesMapping] WITH CHECK ADD FOREIGN KEY([UserId])
REFERENCES [dbo].[Users] ([Id])
GO

Step 2


Make a new project with Visual Studio 2019 or another editor of your choice.

Step 3


Choose the "ASP.NET web application" project and give an appropriate name to your project and then click on "Create".
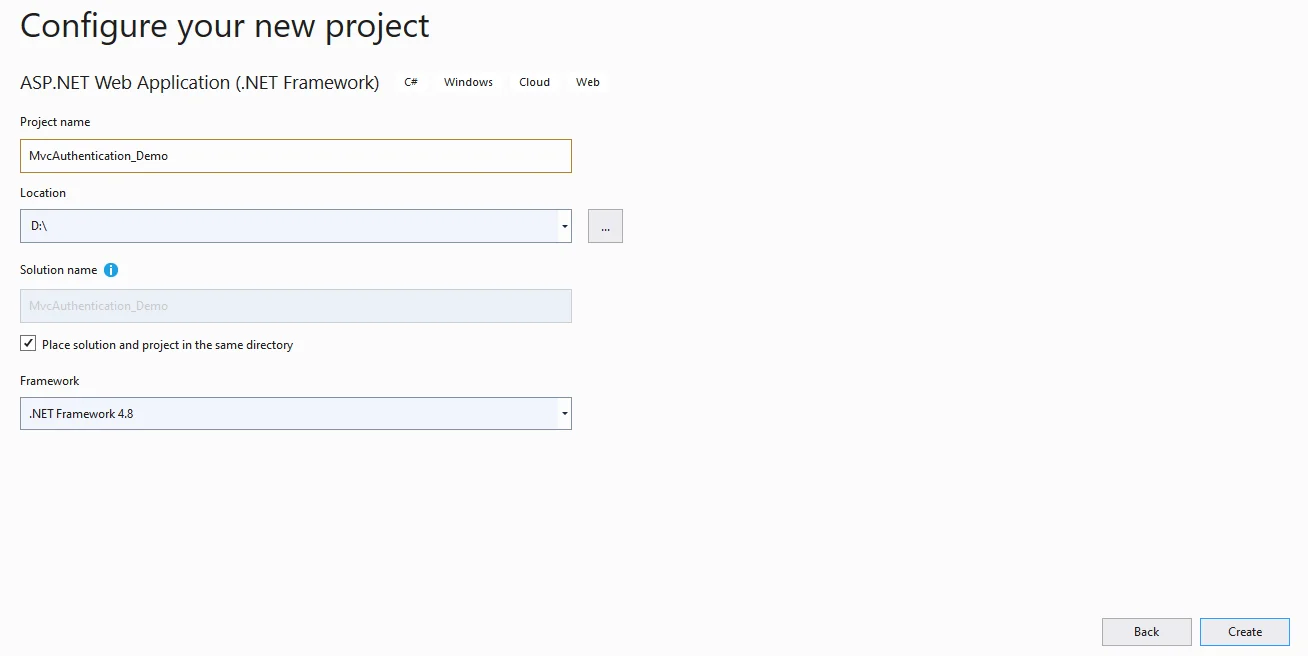
CreateNewASPNET
Figure: Create New ASP.NET Web Application

Step 4


Then, choose “Empty” and select MVC from the checkbox and then add the project.
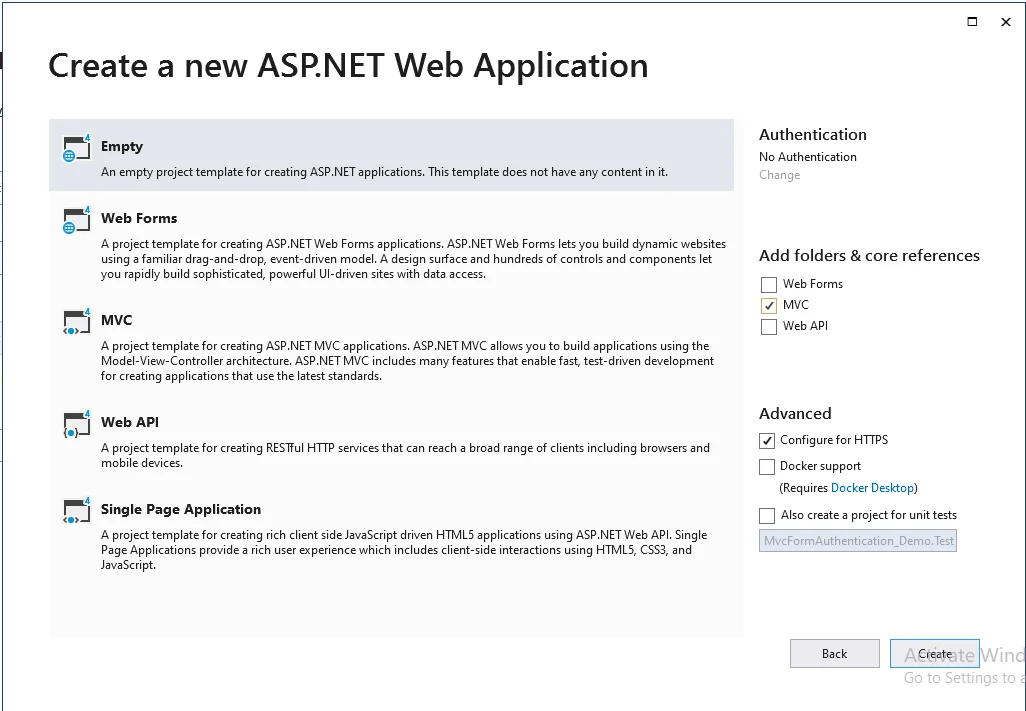
createtheEmptyproject
Figure: create the Empty project after a click on the Mvc checkbox

Step 5

Add a database model by right-clicking the Models folder. Now, add the Entity Framework and for that, you have to right-click on the Models folder and then choose "New item…".
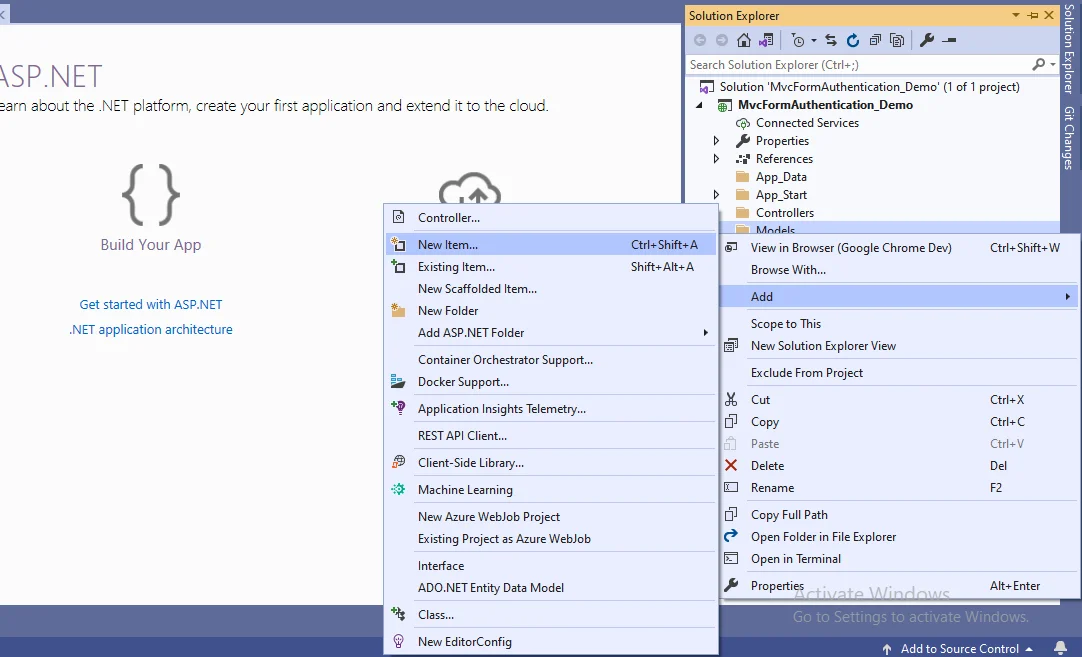
Modelfolder
Figure: add the new item in the Model folder of the project

You will be presented with a window; from there, pick Data from the left panel and select ADO.NET Entity Data Model, name it EmployeeModel (this name is not required; any name will suffice), and click "Add."
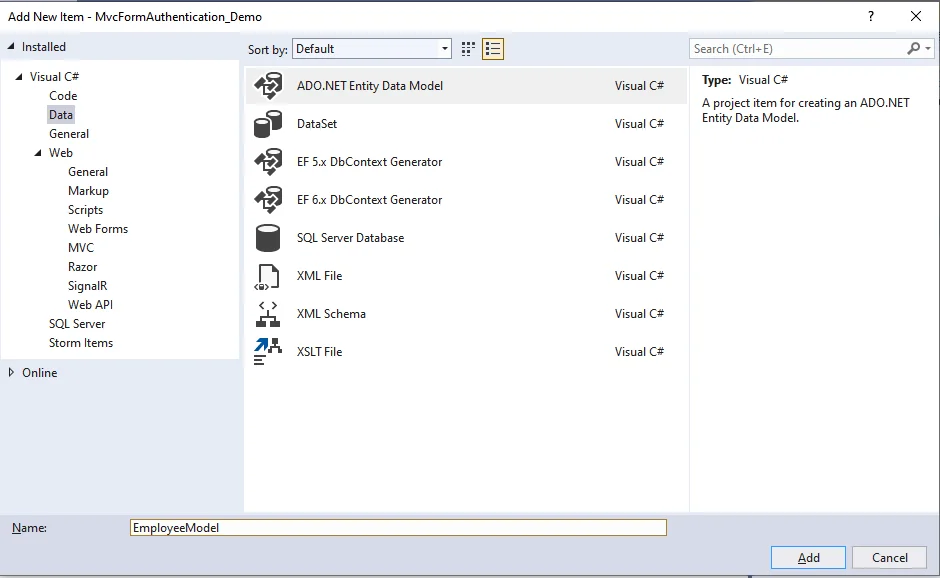
ADO.NETEntityData
Figure: Select the ADO.NET Entity Data Model and Give the name to that Model

The wizard will open after you click "Add a window." Click "Next" after selecting EF Designer from the database.
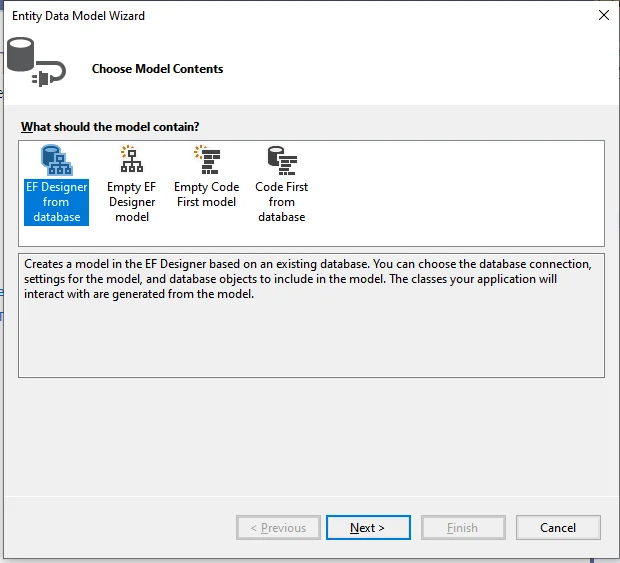
EFDesigner
Select the EF Designer from the database and then click on the next in the wizard
 

A window will display after clicking on "Next".Select "New Connection.". After that, a new window will open. Enter your server's name, followed by a dot if it's a local server (.). Click "OK" after selecting your database.
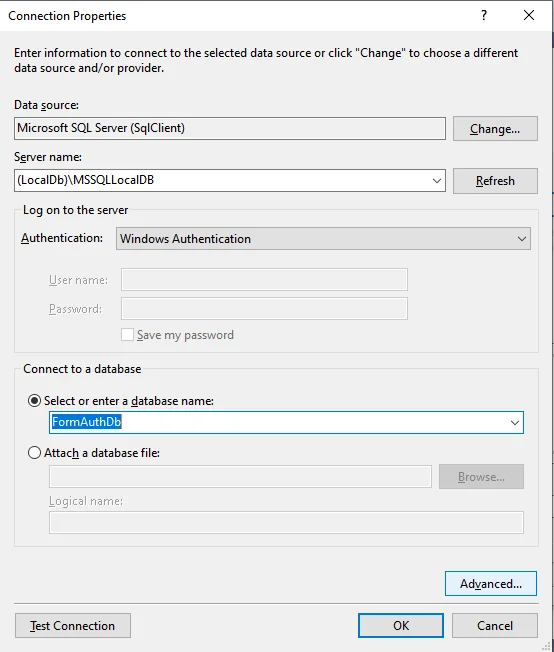
ConnectionProperties
Figure: Connection Properties with server name and database name

The connection will be established. Save the connection name as you wish. Below is where you can modify the name of your connection. The connection will be saved in the web configuration. Now click on the "Next" button.
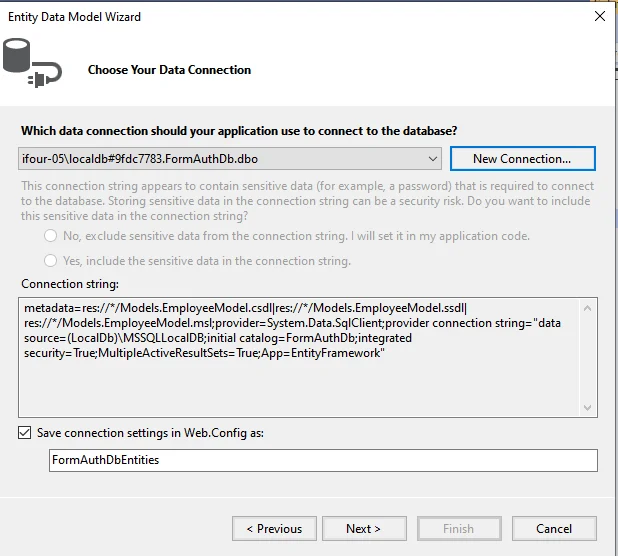
ModelwizARD
Figure: Entity Data Model wizARD with newly connected FormAuthFDb database

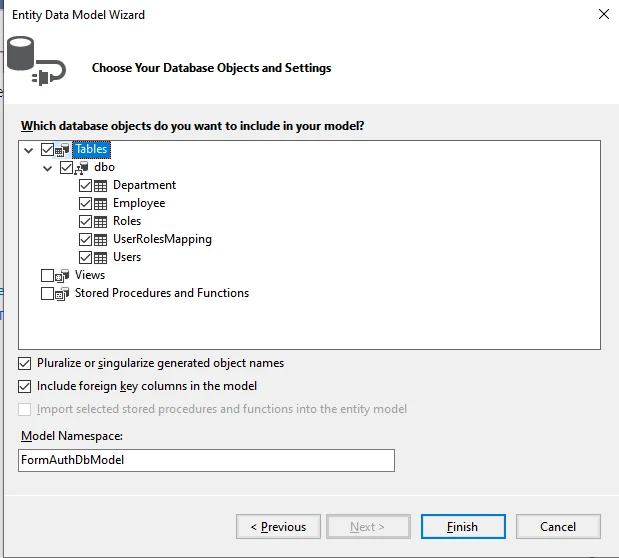
A new window will display after you click NEXT. Click "Finish" after selecting the database table name as seen in the screenshot below.
Createdatabase
Figure: Database table of your created database in SQL Server

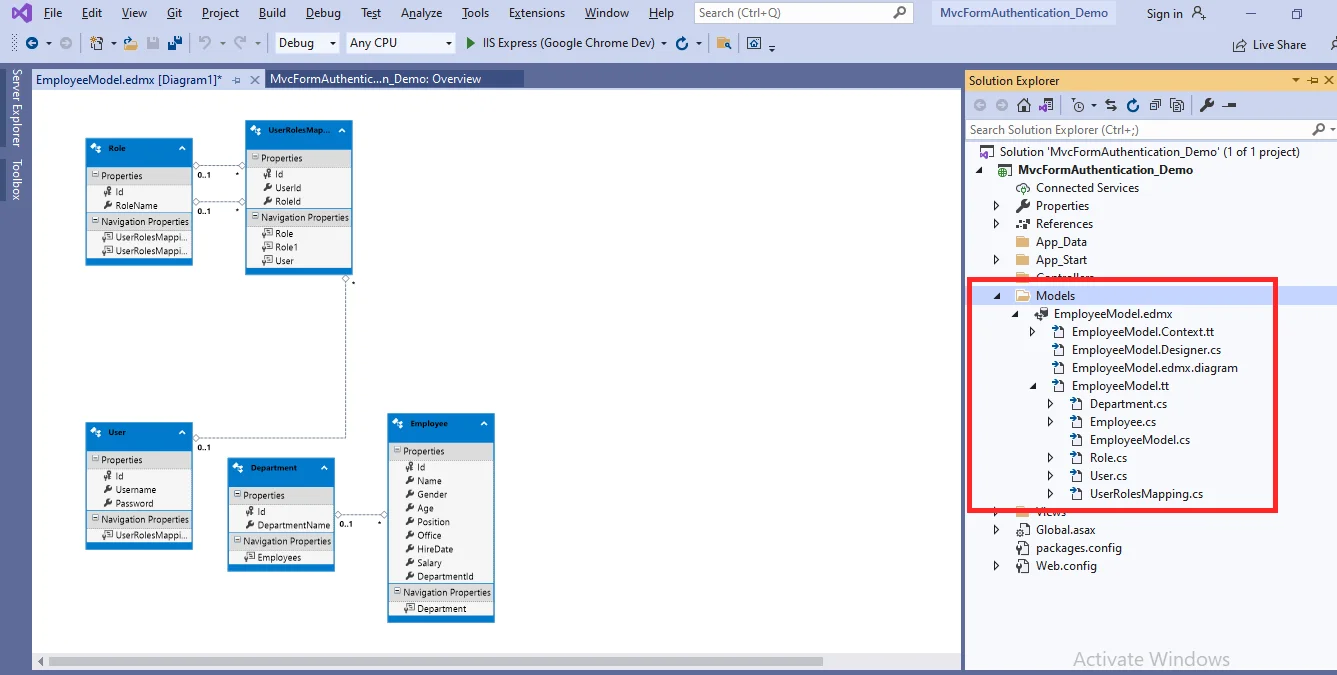
Now, Entity Framework is added, and a class is created for each entity in the Models folder.
EmployeeModel
Figure: Employee Model

Step 6

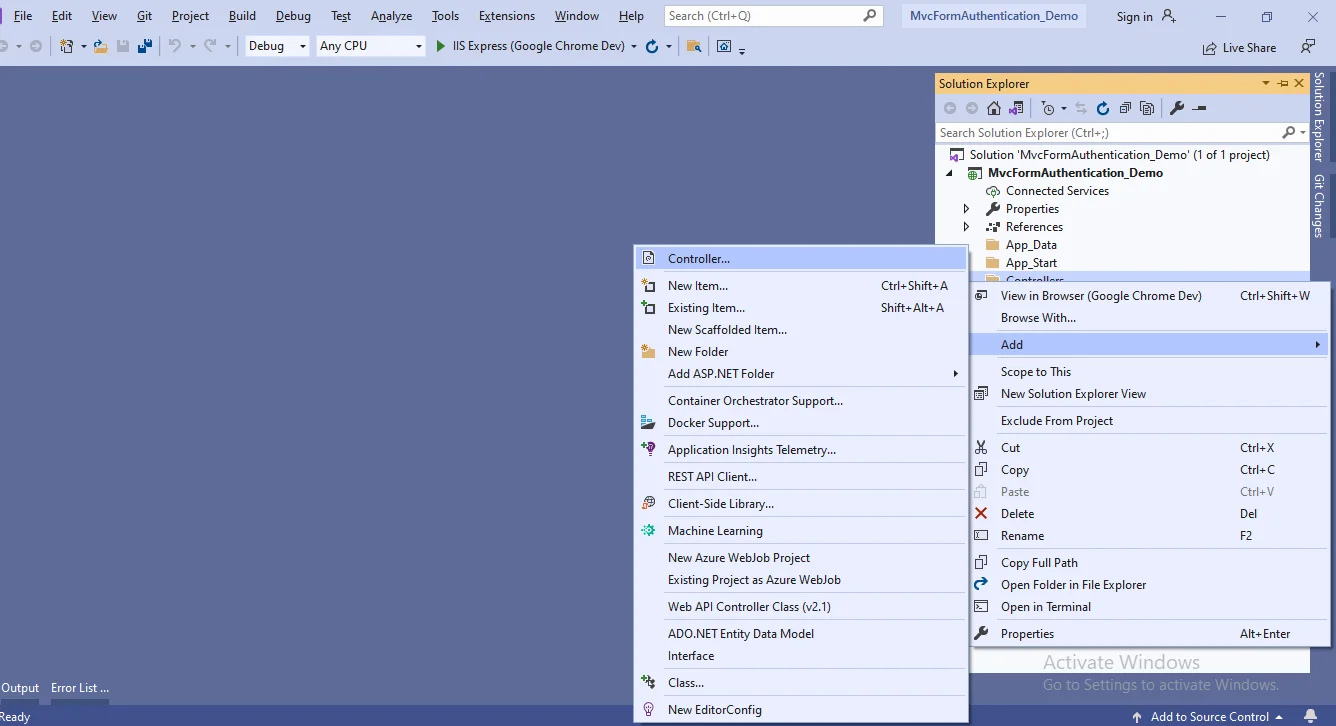
Now right-click the Controllers folder and then choose Add Controller.
Controllerincontroller
Figure: Add the New Controller in controller folder

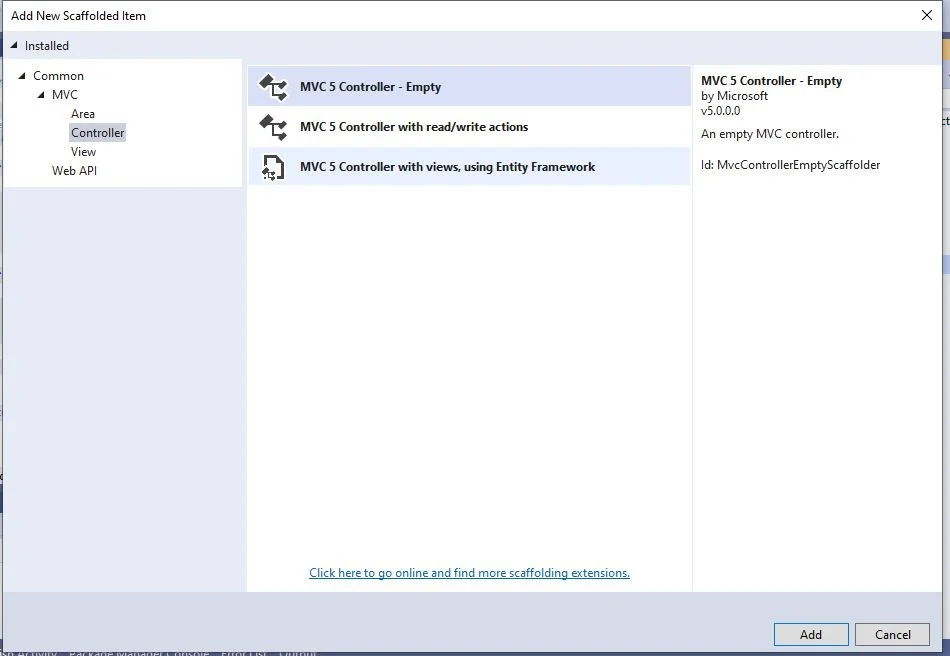
There will be a window appear. Click "Add" after selecting MVC5 Controller-Empty.
MVC5Controller-Empty
Figure: select MVC5 Controller-Empty from the controller

After selecting "Add," a new window with the name DefaultController will appear. Then change the name to the controller HomeController and then click on Add.

HomeController
Figure: change the name of the controller to “HomeController”

Step 7

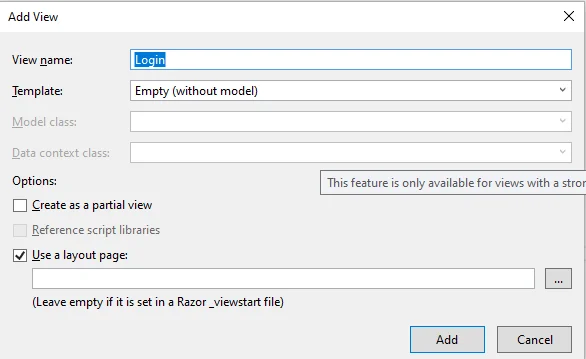
When you right-click on the Index method in HomeController, the "Add View" dialogue will pop up, with the default index name selected (use a Layout page), and after that select the "Add" button to add a view for the index method.

Complete code for HomeController


using MvcFormAuthentication_Demo.Models;
using System;
using System.Collections.Generic;
using System.Linq;
using System.Web;
using System.Web.Mvc;
using System.Web.Security;
namespace MvcFormAuthentication_Demo.Controllers
{
public class HomeController : Controller
{
private readonly FormAuthDbEntities _dbContext = new FormAuthDbEntities();
public ActionResult Index()
{
return View();
}
public ActionResult Login()
{
return View();
}
[HttpPost]
[ValidateAntiForgeryToken]
public ActionResult Login(UserModel user)
{
if (ModelState.IsValid)
{
bool IsValidUser = _dbContext.Users
.Any(u => u.Username.ToLower() == user
.Username.ToLower() && user
.Password == user.Password);
if (IsValidUser)
{
FormsAuthentication.SetAuthCookie(user.Username, false);
return RedirectToAction("Index", "Employee");
}
}
ModelState.AddModelError("", "invalid Username or Password");
return View();
}
public ActionResult Register()
{
return View();
}
[HttpPost]
[ValidateAntiForgeryToken]
public ActionResult Register(User registerUser)
{
if (ModelState.IsValid)
{
_dbContext.Users.Add(registerUser);
_dbContext.SaveChanges();
return RedirectToAction("Login");
}
return View();
}
public ActionResult Logout()
{
FormsAuthentication.SignOut();
return RedirectToAction("Login");
}
}
}

Create two views, one for registration and the other for login.

Register View Code
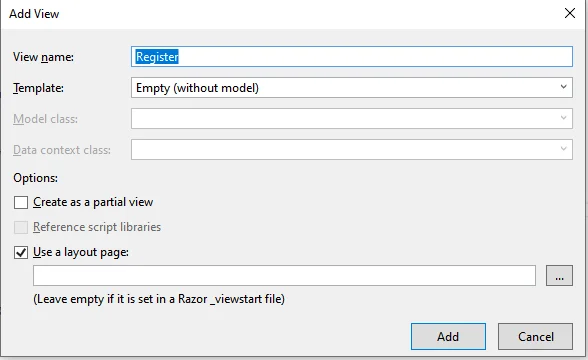

ActionMethod
Figure: Add the view for Register ActionMethod

Register View Code

 
@model MvcFormAuthentication_Demo.Models.UserModel
@{
ViewBag.Title = "Register";
}
@using (Html.BeginForm())
{
@Html.AntiForgeryToken()<div class="card custom-card"><div class="card-header bg-primary text-white"><h3>Register Form</h3></div>
<div class="card-body"><div class="form-group">
@Html.LabelFor(m => m.Username)
@Html.TextBoxFor(m => m.Username, new { @class = "form-control" })
@Html.ValidationMessageFor(m => m.Username)</div>
<div class="form-group">
@Html.LabelFor(m => m.Password)
@Html.PasswordFor(m => m.Password, new { @class = "form-control" })
@Html.ValidationMessageFor(m => m.Password)</div>
<div class="form-group"><button class="btn btn-primary rounded-0" type="submit">Register</button>
@Html.ActionLink("Login here", "Login")</div></div></div>
}
LoginActionMethod
Figure: Add the view for Login ActionMethod

Login View Code


@model MvcFormAuthentication_Demo.Models.UserModel
@{
ViewBag.Title = "Login";
}
@using (Html.BeginForm())
{
@Html.AntiForgeryToken()<div class="card custom-card"><div class="card-header bg-primary text-white"><h3>Login Form</h3></div>
<div class="card-body"><div class="form-group">
@Html.LabelFor(m => m.Username)
@Html.TextBoxFor(m => m.Username, new { @class = "form-control" })
@Html.ValidationMessageFor(m => m.Username)</div>
<div class="form-group">
@Html.LabelFor(m => m.Password)
@Html.PasswordFor(m => m.Password, new { @class = "form-control" })
@Html.ValidationMessageFor(m => m.Password)</div>
<div class="form-group"><button class="btn btn-primary rounded-0" type="submit">Login</button>
@Html.ActionLink("New User", "Register")</div></div></div>
}

Looking for Trusted Dot Net Development Company For Your Business?


Step 8

Add the following code to the system.web section of the web.config file for forms authentication.

<authentication mode="Forms">
<forms loginurl="Home/Login"></forms>
</authentication>
Step 9

Similarly, another controller for CRUD operations should be added by right-clicking on the Controllers folder and select Add Controller.
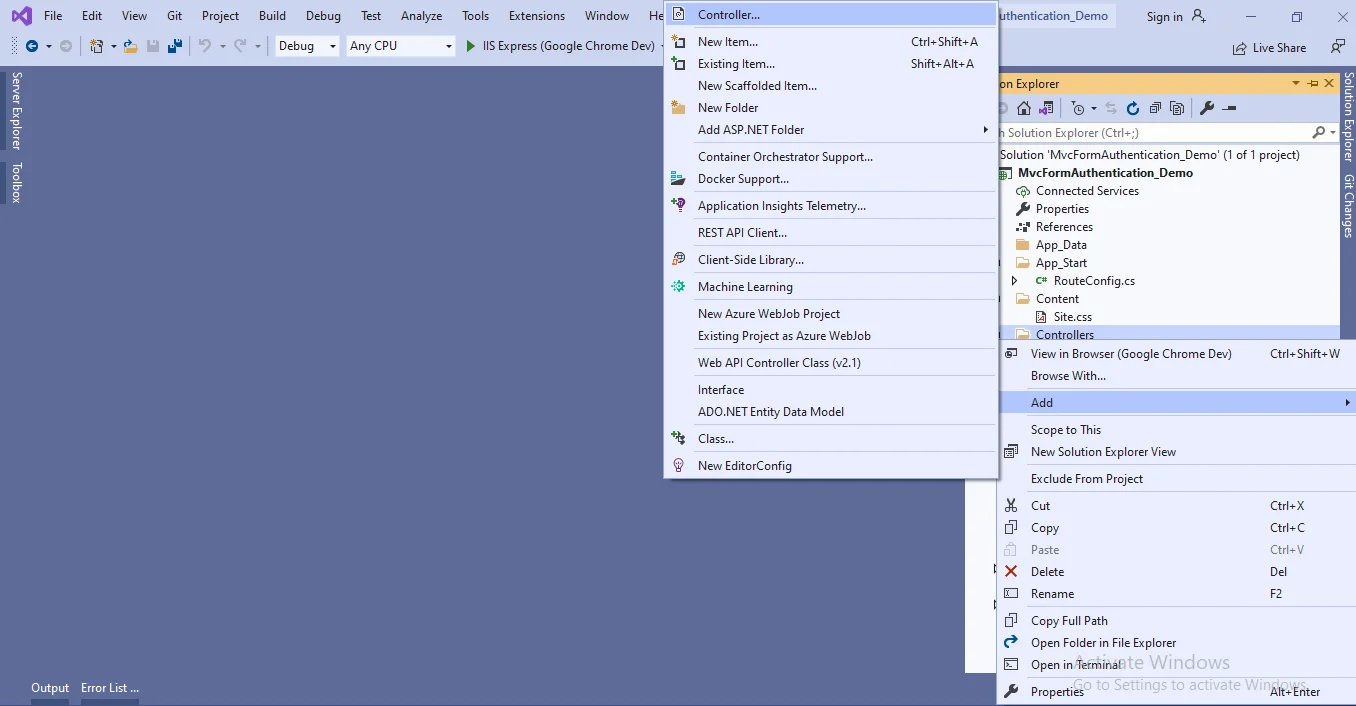
theMVC5controller
Figure: Add the MVC5 controller

A new window will open. Click "Add" to add an MVC5 Controller with a view that uses Entity Framework.
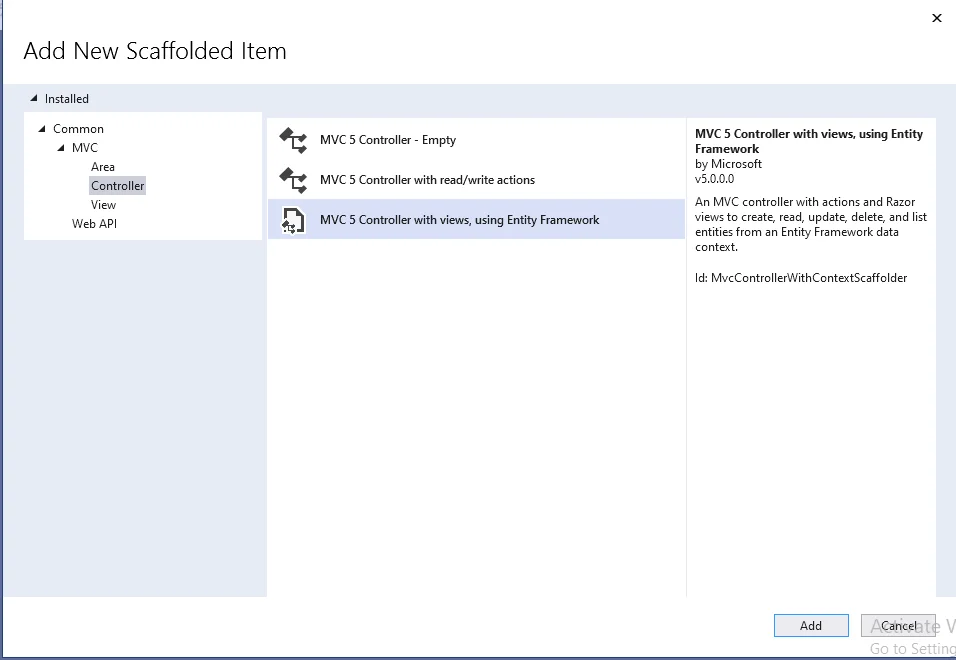
usingEntityFramework
Figure: Select MVC5 Controller with views, using Entity Framework

A new window will display after clicking on "Add", Select a model class and a database context class, and then click on Add. It will create the respective views with the controller - create, edit, update, and delete code and views.
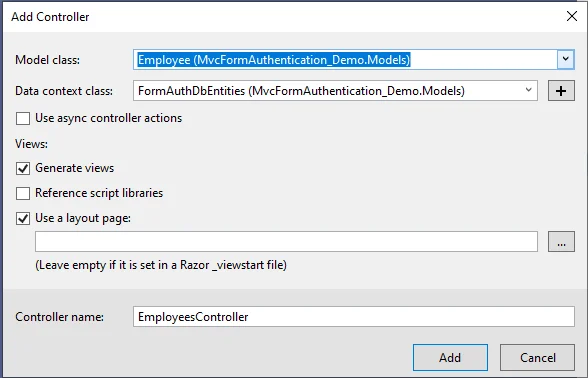
classandDatacontext
Figure: Select Model class and Data context for the controller

Use Authorize Attribute


[Authorize]
public class EmployeesController : Controller
{
}

The Authorize Attribute is a built-in MVC attribute that is used to authenticate a user.Use the Authorize Attribute to protect the action methods that you don't want anonymous users to see.


Step 10

Example

Modify the _Layout.cshtml file with the following code.

 
<nav class="navbar navbar-expand-lg navbar-light bg-light">
<a class="navbar-brand" href="#">
@Html.ActionLink("Application name", "Index", "Home", new { area = "" }, new { @class = "navbar-brand" })
</a><button aria-controls="navbarSupportedContent" aria-expanded="false" aria-label="Toggle navigation" class="navbar-toggler" data-target="#navbarSupportedContent" data-toggle="collapse" type="button"></button>
<div class="collapse navbar-collapse" id="collapsibleNavbar"><ul class="navbar-nav"><li>
@if (User.Identity.IsAuthenticated)
{</li><li>@Html.ActionLink("Employee List", "Index", "Employees", new { @class = "nav-link" })</li><li> </li><li>@Html.ActionLink("Add New Employee", "Create", "Employees", new { @class = "nav-link" })</li><li> </li><li class="nav-item dropdown">
<a aria-expanded="false" aria-haspopup="true" class="nav-link dropdown-toggle text-center text-uppercase" data-toggle="dropdown" href="#" id="navbarDropdown" role="button">
@User.Identity.Name
</a><div aria-labelledby="navbarDropdown" class="dropdown-menu">
<a class="dropdown-item" href="#">My Account</a>
<a class="dropdown-item" href="#">Edit Profile</a><div class="dropdown-divider"> </div>
@Html.ActionLink("Logout", "Logout", "Home", new { @class = "nav-link text-center text-uppercase" })</div></li><li>
}
else
{</li><li>@Html.ActionLink("Home", "Index", "Home", new { @class = "nav-link" })</li><li> </li><li>@Html.ActionLink("About", "About", "Home", new { @class = "nav-link" })</li><li> </li><li>@Html.ActionLink("Register", "Register", "Home", new { @class = "nav-link float-left" })</li><li> </li><li>@Html.ActionLink("Login", "Login", "Home", new { @class = "nav-link float-left" })</li><li>
}</li></ul></div></nav>
Step 11.

Build and run your ASP.net web application with ctrl + F5


Conclusion

In this blog, we learned forms authentication in the Asp.Net web application with an example. It will effectively help in comprehending the essentiality of authentication.

Content source:  https://www.ifourtechnolab.com/blog/explain-forms-authentication-in-asp-net-mvc


Thursday, 6 April 2023

Web Security Tips for Ecommerce Sites


Web Security Tips for Ecommerce Sites

Content source: https://www.ifourtechnolab.com/blog/web-security-tips-for-ecommerce-sites


If you’re planning on starting your very own eCommerce website, you must think about security. You want your website to grow and flourish. In order to successfully achieve this, you have to be sufficiently protected at all times.

Sadly, many new start-ups forget about this highly important aspect. To ensure that you don’t miss out on the best security, we’re going to share with you some great ways that you can start protecting yourself right away.

But before we get to the tips, let’s take a moment to discuss just what eCommerce security actually is. If you’re new to the game, this will give you a better understanding of how it works and why it is so vitally important to your website.

Why You Need eCommerce Security


Having the right security is the most important thing you can do for your eCommerce website. Not having security is putting yourself at risk for attacks and hacks. Virtual thieving is a big business in itself.

You could potentially lose more than just your money. Your whole personal identity could be ruined, resulting in years of recovery. Don’t fall into the trap of thinking it won’t happen to you. Over 14 million people are victims of identity theft each year in America alone!

Furthermore, small businesses are some of the biggest targets for eCommerce startups. Why? Because thieves prey on unsuspecting beginners who aren’t adequately protected against their attacks.

But you have options, and these options can save you from harmful, devastating attacks. As you will soon learn, you can fight back and protect what is rightfully yours. Not only will you be protecting yourself, but you’ll save your valuable customers, too.

Cyber-thieves love to get as much information as they can. It’s more potential money in their grubby little pockets. When consumers know you are safe to do business with, you’re sure to get more traffic your way

Tips for Protecting Your Brand


Now that you know why eCommerce security is so important, let’s explore some great ways you can start protecting your business and brand.


1. Invest in a Secure Web Host and Platform

You’re only putting yourself and your customers at risk by opting for an unprotected web host. Sure, you might think you’re saving money. But the truth is that it’s only a matter of time before your website is breached.

In fact, you can count on attempted attacks to start from the moment you open your doors for business. It pays to protect yourself as best you can, so be sure to compare all of the different platforms that are available to you.

There are all kinds of different attacks that cyber-thieves try. Choose a web host and platform that offers a combination of protection. This will ensure that your eCommerce website has a better chance of avoiding and fighting off attempted theft.


2. Make Sure to Get SSL Certification

Getting an SSL certificate is another must-have for eCommerce startups. Why? Because this helps encrypt vital data so that prying eyes can’t access it.

With an SSL certificate, only you will be able to see and access your online information. But don’t worry about missing out on this crucial step. Every eCommerce website is (basically) required to have an SSL certificate.

These are mandatory so that eCommerce websites are protected against potential attacks of theft and fraud. There are free options as well such as from Lets Encrypt.


3. SQL Checks Are a Must

One form of attacks are SQL injections. SQL, or Standard Query Language, is a language of coding used to get into databases. Unfortunately, it can be manipulated by cyber-thieves if your database isn’t protected.

Fortunately for you, most platforms come with software that regularly scans the database to ensure that no one is illegally accessing it. Sometimes you will have an option to scan at certain times throughout the day, keeping you aware of its activity.

Looking to hire a Web Development Company?
Contact us


4. Don’t Hold on to Customer Data

This is a big one that gets many online merchants in trouble. The more data you keep, the more likely it is to get stolen. How can you manage this?

By letting someone else do it for you. There are plenty of secure payment platforms that can manage your customer’s data, leaving you out of the picture – but in a good way.

You might have to shop around to find one that’s compatible with the web host you’ve chosen. Your goal should be to find a payment platform that provides the best identity theft and fraud prevention for your valuable data.

Not only will this take a huge weight off of your shoulders, but you will know that your customer and sales information are in safe hands.


5. Update Your eCommerce Website

Don’t fall behind in this area. It is just as important as the previous tip to keep your website updated. Remember, cyber-thieves and hackers are always on the prowl and developing new ways to steal your information.

By consistently changing the software, you stand a better chance of keeping these hooligans out of your online information. You may have to manually install your updates, so be sure to keep a close eye on anything new that comes your website’s way.

Conclusion


Starting your own eCommerce website can be a fun and exciting venture. If handled correctly, you can enjoy lots of success. But it pays to take the proper precautions. Security should be at the top of your priorities.

By following these tips from Dusan at VSS Monitoring, you will be well on your way to a safe, secure eCommerce website. There are plenty of other tips to ensure your protection. We urge you to explore all of your options so that you can focus on your business and customers – and not the cyber-thieves who want to destroy what you’ve built.


Monday, 13 March 2023

Performing a Website Migration? Avoid these Basic Mistakes


Content source: https://www.ifourtechnolab.com/blog/performing-a-website-migration-avoid-these-basic-mistakes

An international team of scientists is trying to push the envelope and save humanity from the deadliest pandemic. A virus that had no cure kills nearly every human being on Earth. However, one help could be used as an advantage by a few surviving souls to combat this deadly disease. E-commerce!

Yes, you read it right. During the COVID-19 pandemic, e-commerce came to rescue people like never before. The Internet was instrumental in saving millions of human lives and continues to do so even today. Now imagine a world without e-commerce, or if the severity of the COVID-19 pandemic would have been much higher than what we experienced back then. Like modern-day infrastructure, emergency services, medical facilities, and transportation methods are linked to the internet. Language, too, would have become obsolete during the COVID-19 pandemic if not for the Internet according to experts at RemoteDBA.com.

Effects of COVID -19


The COVID-19 pandemic was a global disaster that had the world on edge. It’s estimated that over 50 million people died during this time, and many more were left without homes or jobs. E-commerce came to the rescue by providing an outlet for those who still wanted to shop online despite the crisis. Many companies used their websites to keep in touch with customers while raising money for relief efforts through donations and fundraisers. E-commerce proved its worth during this challenging time, and it continues to be one of our most reliable resources today when disasters strike around the world.

The world was in turmoil during the COVID-19 pandemic, but E-commerce came to the rescue. During this crisis, when people were afraid and running for their lives, one man stood up and decided to do something about it. He created a website that would allow people worldwide to buy goods from him without ever leaving their homes or risk being exposed to the disease. People could order what they needed online and have it delivered right where they live! This way, if someone had an emergency arise with loved ones who were sick, they didn't have to worry about getting caught by the pandemic while trying to get help for them.

eCommerce to the rescue


This is why we're so lucky that eCommerce exists today; because it has made life easier on everyone during times of crisis like these. It's also allowed us as a society to be more connected than ever before, thanks to its ability to spread information quickly around our globe.


In this article, "E-commerce" refers to incorporating a buying transaction over the Internet, including online shopping and auctions.

While writing about this, what came into our mind initially was - How E-commerce can help save humanity from a deadly disease? To answer that, let's go back in time…way back before we knew what e-commerce is today. Back when it was only something which was just being imagined by some people who were disconnected from the outer world through traditional media!!

Before getting into details, let's understand how things work out today. The financial world is much more complex today than it was back then, the Black Swan idea (by Nassim Taleb) has come into the picture since then, and many concepts like this have become a part of modern-day economics and finance. The way things work in the financial space could be vastly different from what we expect them to be.

Let's take an example - In the COVID-19 pandemic, e-commerce played its role for two reasons:

I. Strongly connected infrastructure of the Internet

II. Availability of enough resources within reach of common people through E-commerce transactions

Why didn't it work before? How did E-commerce kick during the COVID-19 pandemic? E-commerce came to the rescue of people because of two reasons:

  1. The Internet was a lot stronger and interconnected than it was in the past,

  2. More people could make transactions using their personal computers than they could have done with standard methods before the COVID-19 pandemic hit us!!!

Let's look into each of these points one at a time


Connectivity

The Internet today is confined within geographical boundaries and has also gone global. There are no language barriers over the internet like it used to be back then!

It does not matter where you are on this planet earth or where your target audience resides; you can avoid language barriers and connect with them easily via the Internet. There are no boundaries of nations or languages.


Accessibility

One of the primary reasons for not using e-commerce during the COVID-19 pandemic was that only a small part of our population had access to personal computers before the pandemic struck. A computer and internet connection used to be very expensive in the past. Telecom operators were also trying to put monopoly over these services like it is today. Only those who could afford these services would have been able to use them. In such a scenario, most people remained disconnected from the outside world, which inadvertently reduced their ability to perform transactions through E-commerce during the pandemic period.

On the contrary, today, most people on this planet earth own a personal computer with an internet connection. Some people can also access the internet through their cell phones which is like a smartphone these days! This makes it easier for common people to search and buy products online from anywhere, even if they don't have radio, television, or newspapers at their homes nearby. People used e-commerce services as an alternate means of trading during the COVID-19 pandemic period because almost everyone had access to the Internet around that time.

If we look into things closely, we will notice that there were two significant reasons why E-commerce came in handy during the COVID-19 pandemic periods: more connected infrastructure over the Internet and easy availability of more resources for common people due to E-commerce transactions made by them.

Looking for eCommerce Solution Provider For Your Business?


E-commerce is a significant player in the global economy and has been for some time. The COVID-19 pandemic was no different, as it took hold across much of the world without warning or any precedent to get people prepared. Luckily, many retailers could stay afloat by using eCommerce platforms that allowed them to continue selling products even when there wasn't electricity available or business hours in their region. Thanks to these companies' efforts during this trying time, they served their customers and helped keep the economies churning with money coming in from all over the globe. It's an interesting story about how one industry can help save another in need.


Thursday, 16 February 2023

A step-by-step guide on Excel Add-in development using React.js


Content source: https://www.ifourtechnolab.com/blog/a-step-by-step-guide-on-excel-add-in-development-using-react-js


What is an Excel Add-in?


MS Excel Add-in is a kind of program or a utility that lets you perform fundamental processes more quickly. It does this by integrating new features into the excel application that boosts its basic capabilities on various platforms like Windows, Mac & Web.

The Excel Add-in, as part of the Office platform, allows you to modify and speed up your business processes. Office Add-ins are well-known for their centralized deployment, cross-platform compatibility, and AppSource distribution. It enables developers to leverage web technologies including HTML, CSS, and JavaScript.

More importantly, it provides the framework and the JavaScript library Office.js for constructing Excel Add-ins. In this tutorial, we will walk through the basic yet effective process of creating the Excel Addin using ReactJS.

Prerequisites for setting up your development environment


Before you start creating Excel Add-ins, make sure you have these prerequisites installed on your PC.

  • NPM
  • Node.js
  • Visual Studio
  • A Microsoft 365 account with a subscription

Looking for the best Excel Add-in development company? Connect us now.

How to build Excel Add-in using React


To begin, configure and install the Yeoman and Yeoman generator for Office 365 Add-in development.

npm install -g yo generator-office

Now run the following yo command to create an Add-in

yo office

After running the above command, select the Project type as a React framework. Take a look at the reference image below.

Choose a project type - Reactjs
Figure 1 Choose a Project Type

After selecting the project, choose TypeScript as your script type.

Choose a script type - Reactjs
Figure 2 Choose a Script Type

Now, name your Excel Add-in project as shown below. You can give whatever name you like but giving a project-relevant name would be an ideal move.

Give name to addin - Reactjs
Figure 3 Give Name to Add-in

Because it is critical to provide support for the office application, choose Excel as the Office client.

Choose an office client - Reactjs
Figure 4 Choose an Office Client

Congratulations!! Your first Excel Add-in is created successfully.

How to run Excel Add-in?


Add-ins are not instantly accessible in Excel by default. We must activate them before we may use them. Let's have a look at how to use a command prompt to execute Add-ins in MS Excel.

Use the following command and open the project folder on the command prompt.

cd Excel_Tutorial

Now start the dev-server as shown below.

npm run dev-server

To test Add-in in your Excel, run the following command in the project’s root directory.

npm start

When you complete running this command, you should see a task pane added to Excel that operates like an Excel Add in.

Excel Addin taskpane - Reactjs
Figure 5 Excel Addin Taskpane

How to create a Table using ReactJS?


Businesses commonly use tables to present their business data whether it be price, comparison, financial comparison, etc. React.js makes it simple and quick for organizations to manage large amounts of data. Let’s understand the process of creating a table using React.js.

To begin,

Planning to hire dedicated ReactJS developers? Contact us now.


This logic will not execute immediately, Instead, it will be added to the queue of pending commands.

The context.sync method sends all pending commands which are in queue to Excel for execution.

The Excel.run method is followed by the catch block.

handleCreateTable = async () => {
    await Excel.run(async (context) => {

      // logic for create table

      await context.sync();
    }).catch((err) => {
        console.log("Error: " + err);
      });
  }


const currentWorksheet = context.workbook.worksheets.getActiveWorksheet();


Once we get the worksheet, we’ll create a table. Use the following method to create a table.

const salaryTable = currentWorksheet.tables.add("A1:D1", true);


The table is generated by using the add() function on the table collection of the current worksheet. The method accepts the first parameter as a range of the top row of the table.

We can also give a name to our table as shown below.

  salaryTable.name = "SalaryTable";

 salaryTable.getHeaderRowRange().values = 
[["Name", "Occupation", "Age","Salary"]];

The table's rows are then inserted using the add() function of the table's row collection. We may add several rows in a single request by sending an array of cell values within the parent array.

 salaryTable.rows.add(null /*add at the end*/, [
    ["Poojan", "Software Developer","39", "50,000"],
        ["Meera", "Fashion Designer","23", "30,000"],
        ["Smit", "Teacher", "25","35,000"],
        ["Kashyap", "Scientist", "29","70,000"],
        ["Neha", "Teacher","34", "15,000"],
        ["Jay", "DevOps Developer","31", "65,000"]
      ]);


salaryTable.columns.getItemAt(3).getRange().numberFormat = [['##0.00']];


salaryTable.getRange().format.autofitColumns();
salaryTable.getRange().format.autofitRows();


Let’s take a look at how the entire function appears to be.

handleCreateTable = async () => {
    await Excel.run(async (context) => {

      const currentWorksheet=context.workbook.worksheets.getActiveWorksheet();
      const salaryTable = currentWorksheet.tables.add("A1:D1", true );
      salaryTable.name = "SalaryTable";

      salaryTable.getHeaderRowRange().values =
        [["Name", "Occupation", "Age", "Salary"]];

      salaryTable.rows.add(null /*add at the end*/, [
        ["Poojan", "Software Developer", "39", "50,000"],
        ["Meera", "Fashion Designer", "23", "30,000"],
        ["Smit", "Teacher", "25", "35,000"],
        ["Kashyap", "Scientist", "29", "70,000"],
        ["Neha", "Teacher", "34", "15,000"],
        ["Jay", "DevOps Developer", "31", "65,000"]
      ]);

      salaryTable.columns.getItemAt(3).getRange().numberFormat = [['##0.00']];
      salaryTable.getRange().format.autofitColumns();
      salaryTable.getRange().format.autofitRows();

      await context.sync();

    }).catch((err) => {
      console.log("Error: " + err);
    });
  }


  1. Open the project in VS code
  2. Open the file which is located in src\taskpane\components\app.tsx
  3. Remove the componentDidMount() method and click() method from app.tsx
  4. Remove all tags which are inside the return method and add one button inside the return method to generate a table
  5. App.tsx
    import * as React from "react";
    import Home from "./Home";
    
    export interface AppProps {
      title: string;
      isOfficeInitialized: boolean;
    }
    
    export default class App extends React.Component {
      constructor(props, context) {
        super(props, context);
        this.state = {
          listItems: [],
        };
      }
    
      render() {
        const { title, isOfficeInitialized } = this.props;
    
        if (!isOfficeInitialized) {
          return (
                                
          );
        }
    
        return (
            <>
            
        );
      }
    }
    
    
  6. Create one event handler function for the button which will contain the logic for creating a new table.
  7. Excel.js business logic will be added to the handleCreateTable function that is passed to Excel.run method.
  8. In Excel.run method, first we have to get the current worksheet, and to do so, use the following method.
  9. Now, add a header row using the code shown below.
  10. We can change the format of salary to decimal. For that, we have to pass the column zero-based index to the getItemAt() method.
  11. When we use the table to represent business data, it is important to ensure content is displayed clearly. With the fine use of the autofitColumns() and autofitRows() methods, we can perfectly fit the content into cells.
  12. Now, use the npm start command to run the code. That's all there is to it; now, when the user hits the generate table button, he'll see the following result.
  13. Output: Generate a new table - Reactjs
    Figure 6 Generate a new table

How to Filter data in a table?


Filtering data is critical because organizations utilize it to exclude undesired results for analysis. Let's see how data in a table may be filtered for better analysis.


const currentWorksheet = context.workbook.worksheets.getActiveWorksheet();
const salaryTable = currentWorksheet.tables.getItem('salaryTable');


const occupationFilter = salaryTable.columns.getItem('Occupation').filter;


Here, Occupation is the column name on which we want to apply the filter.

occupationFilter.applyValuesFilter(['Software Developer', 'Teacher']);

filterData = async () => {
    await Excel.run(async (context) => {

      const currentWorksheet=context.workbook.worksheets.getActiveWorksheet();
      const salaryTable = currentWorksheet.tables.getItem('salaryTable');
      const occupationFilter=salaryTable.columns.getItem('Occupation').filter;
      occupationFilter.applyValuesFilter(['Software Developer', 'Teacher']);

      await context.sync();
    }).catch((err) => {
      console.log("Error: " + err);
    });
  }


  1. Open the project in Visual Studio code
  2. Open the file which is located in src\taskpane\components\app.tsx
  3. Add a new button for filter data below Generate Table button.
  4. Create one event handler function for the button that will contain the filter data logic.
  5. filterData function:
    filterData = async () => {
        await Excel.run(async (context) => {
          await context.sync();
        }).catch((err) => {
          console.log("Error: " + err);
        });
      }


  6. Then we will get the current worksheet and table.
  7. To begin filtering data, we must first access the column from which we will be filtering data.
  8. Next, pass the values as a filter query.
  9. Meanwhile, take a look at how the whole function looks like.
  10. Finally, run the code using the npm start command. Now when the user clicks on the filter data button, he’ll see the following result.
  11. Output: Filter data - Reactjs
    Figure 7 Filter data

How to sort data in the table?


Data sorting is also important since it helps to obtain well-organized data in a sequential manner. Let’s understand in simple ways, how data can be sorted in a table.

To start with,


Searching for the best Microsoft 365 development solutions? Your search ends here.


button onclick="{this.sortData}">Sort Data


const currentWorksheet = context.workbook.worksheets.getActiveWorksheet();
const salaryTable = currentWorksheet.tables.getItem('salaryTable');


salaryTable.sort.apply(sortFields);


sortData = async () => {
    await Excel.run(async (context) => {

      const currentWorksheet=context.workbook.worksheets.getActiveWorksheet();
      const salaryTable = currentWorksheet.tables.getItem('salaryTable');

      const sortFields = [
        {
          key: 3,
          ascending: false,
        }
      ];

      salaryTable.sort.apply(sortFields);

      await context.sync();
    }).catch((err) => {
      console.log("Error: " + err);
    });
  }


Finally, run the code with the npm start command. The user will see the following result every time he clicks on the sort data button.

  1. Open the project in VS code
  2. Open the file from the path: src\taskpane\components\app.tsx
  3. Add a new button for sorting data below the filter data button.
  4. Create one event handler function for the button which will contain the logic for sorting the data.
  5. sortData function:
    sortData=async()=>{
       await Excel.run(async (context) => {
        await context.sync();
        }).catch((err) => {
          console.log("Error: " + err);
        });
      }   
    
    
  6. Let's start by getting the current worksheet and table.
  7. In the function, we will build a sort field object and supply two parameters to it: the key and the type of sorting (ascending or descending).
  8. Note:

    The key property is the zero-based index of the column, and it is used for sorting. All the rows of data are sorted according to key.

    const sortFields = [
            {
              key: 3,
              ascending: false,
            }
          ];
    
    
  9. Subsequently, we use the sort and apply method on the table and pass the sortFields object.
  10. Here is what the whole function might look like.
  11. Run the code using the npm start command
  12. output Sort data - Reactjs
    Figure 8 Sort Data

Conclusion


Office Add-ins benefit businesses with faster operations and processes. In Office Add-ins, you can use familiar technologies like HTML, CSS & JavaScript to create Outlook, Excel, Word, and PowerPoint Add-ins. In this blog, we learned how to create an Excel Addin with React library from scratch and how to create tables, filter & sort data in Excel using Excel Add-in.

PowerApps Consulting Services - Driving Innovation in Enterprise Solutions

Driving innovation while keeping costs in check is something that every executive looks for. Microsoft Power Apps is a leading low-code app ...